<?xml version="1.0" encoding="utf-8"?><feed xmlns="http://www.w3.org/2005/Atom" ><generator uri="https://jekyllrb.com/" version="3.10.0">Jekyll</generator><link href="/dev-blog/feed.xml" rel="self" type="application/atom+xml" /><link href="/dev-blog/" rel="alternate" type="text/html" /><updated>2026-05-04T02:07:38+00:00</updated><id>/dev-blog/feed.xml</id><title type="html">Yuval’s Dev Blog</title><subtitle>This is my blog</subtitle><author><name>Yuval Timen</name></author><entry><title type="html">Intro to APIs</title><link href="/dev-blog/2026/01/18/intro-to-apis.html" rel="alternate" type="text/html" title="Intro to APIs" /><published>2026-01-18T19:00:00+00:00</published><updated>2026-01-18T19:00:00+00:00</updated><id>/dev-blog/2026/01/18/intro-to-apis</id><content type="html" xml:base="/dev-blog/2026/01/18/intro-to-apis.html"><![CDATA[<p><img src="/dev-blog/assets/images/urls.png" /></p>

<p>So you want to use APIs to programmatically collect data? Sounds great!</p>

<p>First it’s good to note that there are many types of APIs, so when we talk about “an API”, we are usually talking about 
a specific company’s API, such as “the Twitter API”, or “the TicketData API”.</p>

<!-- excerpt-start -->
<p>Most web products <em>provide</em> an API, which is a way to expose and interact with the contents of a database in a safe and efficient way.
<!-- excerpt-end --></p>

<p>An API is a mechanism for accessing information. Consider a two party system: a Client requests data from a Server,
which responds to the client with the requested data. An API is the tool that the Server provides to the Client in 
order to best request data from the Server.</p>

<div class="language-plaintext highlighter-rouge"><div class="highlight"><pre class="highlight"><code>Request:
Client |-------&gt; Server

.
. (2sec.)
.

Response
Server |-------&gt; Client

</code></pre></div></div>

<p>Accessing an API is based on URLs: each URL can model the data, because URLs can encode information.</p>

<p>ULSs can be very long and contain many nested sequences, so let’s start with how they work.</p>

<h3 id="a-closer-look-at-http">A Closer Look At HTTP</h3>

<p>HTTP is the thing that makes APIs work in the first place. When you type in a URL, the browser actually reads it, 
parses it, and submits an “HTTP Request” on your behalf. HTTP Requests are essentially just structured request format 
that allow servers to speak the same language as the Client making the request.</p>

<p>Let’s look at how URLs are parsed. Here’s what the Server sees when they look at a URL:</p>

<div class="language-plaintext highlighter-rouge"><div class="highlight"><pre class="highlight"><code>http://what-is-an-api.com:8080/base/path/to/resource
</code></pre></div></div>

<ul>
  <li><code class="language-plaintext highlighter-rouge">http://</code> - This is the protocol prefix, it is saying to use the “HTTP” protocol. The protocol determines the “format for the conversation” between Client and Server. Some other protocols are <code class="language-plaintext highlighter-rouge">https://</code>, <code class="language-plaintext highlighter-rouge">file://</code>, <code class="language-plaintext highlighter-rouge">ws://</code>, and more.</li>
  <li><code class="language-plaintext highlighter-rouge">what-is-an-api.com</code> - This is the domain, which typically represents the Server’s identity. Like how <code class="language-plaintext highlighter-rouge">facebook.com</code> belongs to Facebook.</li>
  <li><code class="language-plaintext highlighter-rouge">:8080</code> - The port number to connect to. Web servers use a combination of “domain:port” to allow multiple different services to be run on the same domain. We’ll talk about this later on.</li>
  <li><code class="language-plaintext highlighter-rouge">/base/path/to/endpoint</code> - The data endpoint you are accessing. It’s a string of characters that encode the path to some resource.</li>
</ul>

<p>Ultimately, we treat everything like a “resource”, or an “object”. For example, Users, Posts, Tickets, Seats, Credit
Cards, etc. These things are all modeled as “resources”. From here, we’ll just refer to them as “objects”.</p>

<p>In your experience with APIs, you may stumble upon arbitrary-looking endpoints; for example, Facebook might have something like:</p>

<div class="language-plaintext highlighter-rouge"><div class="highlight"><pre class="highlight"><code>https://facebook.com/dwkoemfoekfj/qlwkdn2o3irh_22i314
</code></pre></div></div>

<p>Ignore these for now. Normally, APIs are designed to expose their data in an easy-to-read format. So instead, an API 
would expose their resources in a much more structured fashion. The “Users” resource might be found at 
<code class="language-plaintext highlighter-rouge">https://facebook.com/users</code>, or possibly with some prefix like <code class="language-plaintext highlighter-rouge">https://facebook.com/api/v2/users</code> with <code class="language-plaintext highlighter-rouge">api/v2/</code> to 
indicate that this is Version 2 of this API, or something similar.</p>

<p>When the Client makes the HTTP Request, the Server receives it, processes it, then returns the requested data. This 
could involve looking up users from a database or maybe the Server itself needs to make another external request to yet 
another Server to get data. This is extremely common. It’s actually how the internet is built!</p>

<p>The flexibility of APIs is that companies use the flexibility of HTTP to define their own domain of objects. So 
Facebook is modeling Users posting on Walls, but different companies model different things, like TicketData would 
need to model Tickets and Prices. So how could we make the data more concrete? So far, we’ve only visited the 
“users endpoint”. What does that do?</p>

<h3 id="sending-an-http-request">Sending an HTTP Request</h3>

<p>When you visit a URL in the browser, the browser does some work for you. In this case, it’s building an HTTP GET 
Request object and sending it to the network; the network knows how to connect the client to the correct resource. 
There are a few types of requests in HTTP:</p>

<ul>
  <li>GET Request</li>
  <li>POST Request</li>
  <li>PUT Request</li>
  <li>PATCH Request</li>
  <li>DELETE Request</li>
  <li>HEAD Request</li>
  <li>OPTIONS Request</li>
</ul>

<p>For today, we’ll only cover GET and POST Requests. As you might guess, GET Requests are a request to get data.
POST Requests are used to submit data to the server. We’ll come back to this, but for now let’s focus on just the URL.</p>

<p>So taking into account the implicit “GET” being made by the browser, a GET Request <em>actually</em> looks like this:</p>

<p><code class="language-plaintext highlighter-rouge">GET http://what-is-an-api.com:8080/base/path/to/resource</code></p>

<p>Now the server knows exactly what to do. It will use the <code class="language-plaintext highlighter-rouge">http</code> protocol to visit the <code class="language-plaintext highlighter-rouge">what-is-an-api.com</code> domain 
at port <code class="language-plaintext highlighter-rouge">8080</code> and request to <code class="language-plaintext highlighter-rouge">GET</code> the endpoint <code class="language-plaintext highlighter-rouge">/base/path/to/resource</code>. This will run a query for “all instances 
of the given resource” - usually referred to as “listing” the resource.</p>

<p>Let’s try this on a real API - mine! Ha! Copy this into your browser and see what you get:</p>

<div class="language-plaintext highlighter-rouge"><div class="highlight"><pre class="highlight"><code>https://p1xy94s1ni.execute-api.us-east-1.amazonaws.com/dev/events
</code></pre></div></div>

<p>(Notice my domain: <code class="language-plaintext highlighter-rouge">p1xy94s1ni.execute-api.us-east-1.amazonaws.com</code> - I haven’t configured the Domain Name Mapping yet, 
so that’s why the domain is a bunch of garbled letters.)</p>

<p>You probably see a wall of data - try clicking the “Pretty-print” button (on Desktop only) and notice the structure. 
It’s using a format called JSON. JSON stands for JavaScript Object Notation. It’s probably the most 
standard format for data for now. The way it works is simple, but very powerful. It is defined recursively:</p>

<p>A JSON object is denoted with curly braces and has key-value pairs to denote its attributes.</p>

<div class="language-json highlighter-rouge"><div class="highlight"><pre class="highlight"><code><span class="p">{</span><span class="w">
  </span><span class="nl">"attribute_1"</span><span class="p">:</span><span class="w"> </span><span class="mi">1</span><span class="p">,</span><span class="w">  
  </span><span class="nl">"attribute_2"</span><span class="p">:</span><span class="w"> </span><span class="s2">"two"</span><span class="p">,</span><span class="w">
  </span><span class="nl">"attribute_3"</span><span class="p">:</span><span class="w"> </span><span class="mf">3.14</span><span class="p">,</span><span class="w">
  </span><span class="nl">"attribute_4"</span><span class="p">:</span><span class="w"> </span><span class="kc">true</span><span class="p">,</span><span class="w">
  </span><span class="nl">"attribute_5"</span><span class="p">:</span><span class="w"> </span><span class="kc">null</span><span class="w">
</span><span class="p">}</span><span class="w">
</span></code></pre></div></div>

<p>Take this JSON for example - it has 5 attributes, and their values have different types. In order, we have:</p>
<ol>
  <li>The value associated with <code class="language-plaintext highlighter-rouge">attribute_1</code> is an <code class="language-plaintext highlighter-rouge">int</code> (denoting integers)…</li>
  <li>For <code class="language-plaintext highlighter-rouge">attribute_2</code>, we have a <code class="language-plaintext highlighter-rouge">string</code>…</li>
  <li>For <code class="language-plaintext highlighter-rouge">attribute_3</code>, a <code class="language-plaintext highlighter-rouge">float</code>, which is used to represent decimals</li>
  <li>For <code class="language-plaintext highlighter-rouge">attribute_4</code>, a <code class="language-plaintext highlighter-rouge">bool</code>, short for boolean, so true or false</li>
  <li>For <code class="language-plaintext highlighter-rouge">attribute_5</code>, a <code class="language-plaintext highlighter-rouge">null</code> value, meaning an absence of any data there. Null values are often special cases when working with data objects and should be paid attention to.</li>
</ol>

<p>These data types are typically referred to as JSON atoms. They are the simplest forms of JSON data, and the object defined above is a JSON object containing 
only JSON atoms. You can think of JSON atoms as direct representation of real data fields, so for example, if we were modeling mailing addresses, the street name 
would be a <code class="language-plaintext highlighter-rouge">string</code>, and the house number might be an <code class="language-plaintext highlighter-rouge">int</code>. JSON atoms are the actual values, whereas JSON “objects” are the full JSON data structure.
In the case above we have a simple JSON object that contains a “flat” set of attributes; each of its attributes’ values is a single JSON atom. 
But JSON can also define lists of values, so you can have:</p>

<div class="language-json highlighter-rouge"><div class="highlight"><pre class="highlight"><code><span class="p">{</span><span class="w">
  </span><span class="nl">"attribute_1"</span><span class="p">:</span><span class="w"> </span><span class="mi">1</span><span class="p">,</span><span class="w">  
  </span><span class="nl">"attribute_2"</span><span class="p">:</span><span class="w"> </span><span class="s2">"two"</span><span class="p">,</span><span class="w">
  </span><span class="nl">"attribute_3"</span><span class="p">:</span><span class="w"> </span><span class="mf">3.14</span><span class="p">,</span><span class="w">
  </span><span class="nl">"attribute_4"</span><span class="p">:</span><span class="w"> </span><span class="kc">true</span><span class="p">,</span><span class="w">
  </span><span class="nl">"attribute_5"</span><span class="p">:</span><span class="w"> </span><span class="p">[</span><span class="s2">"other"</span><span class="p">,</span><span class="w"> </span><span class="s2">"data"</span><span class="p">,</span><span class="w"> </span><span class="mi">3</span><span class="p">,</span><span class="w"> </span><span class="mi">4</span><span class="p">,</span><span class="w"> </span><span class="mi">5</span><span class="p">]</span><span class="w">
</span><span class="p">}</span><span class="w"> 
</span></code></pre></div></div>

<p>In this case the value of attribute_5 is a list containing other data atoms. And in fact, JSON can even be nested, meaning the value of an attribute can itself be a JSON object:</p>

<div class="language-json highlighter-rouge"><div class="highlight"><pre class="highlight"><code><span class="p">{</span><span class="w">
  </span><span class="nl">"attribute_1"</span><span class="p">:</span><span class="w"> </span><span class="mi">1</span><span class="p">,</span><span class="w">  
  </span><span class="nl">"attribute_2"</span><span class="p">:</span><span class="w"> </span><span class="s2">"two"</span><span class="p">,</span><span class="w">
  </span><span class="nl">"attribute_3"</span><span class="p">:</span><span class="w"> </span><span class="mf">3.14</span><span class="p">,</span><span class="w">
  </span><span class="nl">"attribute_4"</span><span class="p">:</span><span class="w"> </span><span class="kc">true</span><span class="p">,</span><span class="w">
  </span><span class="nl">"attribute_5"</span><span class="p">:</span><span class="w"> </span><span class="p">{</span><span class="w">
      </span><span class="nl">"inner_attr"</span><span class="p">:</span><span class="w"> </span><span class="s2">"value of inner attr"</span><span class="p">,</span><span class="w">
      </span><span class="nl">"another_attr"</span><span class="p">:</span><span class="w"> </span><span class="mi">2</span><span class="w">
    </span><span class="p">}</span><span class="w">
</span><span class="p">}</span><span class="w">
</span></code></pre></div></div>

<p>There is no limit to the depth of nesting you can do, and each attribute’s value can be either:</p>
<ol>
  <li>a JSON atom</li>
  <li>a JSON object</li>
  <li>a list of JSON atoms or objects</li>
</ol>

<p>To make this concrete, here’s an example of a JSON object with complex structure:</p>

<div class="language-json highlighter-rouge"><div class="highlight"><pre class="highlight"><code><span class="p">{</span><span class="w">
  </span><span class="nl">"order"</span><span class="p">:</span><span class="w"> </span><span class="p">{</span><span class="w">
      </span><span class="nl">"id"</span><span class="p">:</span><span class="w"> </span><span class="mi">1</span><span class="p">,</span><span class="w">
      </span><span class="nl">"user"</span><span class="p">:</span><span class="w"> </span><span class="p">{</span><span class="w">
          </span><span class="nl">"name"</span><span class="p">:</span><span class="w"> </span><span class="s2">"John Smith"</span><span class="p">,</span><span class="w">
          </span><span class="nl">"dob"</span><span class="p">:</span><span class="w"> </span><span class="s2">"3/12/1991"</span><span class="w">
      </span><span class="p">},</span><span class="w">
      </span><span class="nl">"items"</span><span class="p">:</span><span class="w"> </span><span class="p">[</span><span class="w">
          </span><span class="p">{</span><span class="w">
            </span><span class="nl">"sku"</span><span class="p">:</span><span class="w"> </span><span class="s2">"19224"</span><span class="p">,</span><span class="w">
            </span><span class="nl">"name"</span><span class="p">:</span><span class="w"> </span><span class="s2">"Avocado"</span><span class="p">,</span><span class="w">
            </span><span class="nl">"amount"</span><span class="p">:</span><span class="w"> </span><span class="mi">3</span><span class="p">,</span><span class="w">
            </span><span class="nl">"unit_price"</span><span class="p">:</span><span class="w"> </span><span class="mf">3.99</span><span class="w">
          </span><span class="p">},</span><span class="w">
          </span><span class="p">{</span><span class="w">
            </span><span class="nl">"sku"</span><span class="p">:</span><span class="w"> </span><span class="s2">"12414"</span><span class="p">,</span><span class="w">
            </span><span class="nl">"name"</span><span class="p">:</span><span class="w"> </span><span class="s2">"Banana"</span><span class="p">,</span><span class="w">
            </span><span class="nl">"amount"</span><span class="p">:</span><span class="w"> </span><span class="mi">1</span><span class="p">,</span><span class="w">
            </span><span class="nl">"unit_price"</span><span class="p">:</span><span class="w"> </span><span class="mf">0.30</span><span class="w">
          </span><span class="p">}</span><span class="w">
      </span><span class="p">],</span><span class="w">
      </span><span class="nl">"method"</span><span class="p">:</span><span class="w"> </span><span class="s2">"delivery"</span><span class="p">,</span><span class="w">
      </span><span class="nl">"details"</span><span class="p">:</span><span class="w"> </span><span class="p">{</span><span class="w">
          </span><span class="nl">"address"</span><span class="p">:</span><span class="w"> </span><span class="p">{</span><span class="w">
          </span><span class="nl">"street"</span><span class="p">:</span><span class="w"> </span><span class="s2">"Main Street"</span><span class="p">,</span><span class="w">
          </span><span class="nl">"house_number"</span><span class="p">:</span><span class="w"> </span><span class="mi">135</span><span class="p">,</span><span class="w">
          </span><span class="nl">"apt_number"</span><span class="p">:</span><span class="w"> </span><span class="kc">null</span><span class="w">
      </span><span class="p">},</span><span class="w">
      </span><span class="nl">"delivery_instructions"</span><span class="p">:</span><span class="w"> </span><span class="s2">"Just leave at the door - thanks!"</span><span class="w">
    </span><span class="p">}</span><span class="w">
  </span><span class="p">}</span><span class="w">
</span><span class="p">}</span><span class="w">
</span></code></pre></div></div>

<p>Copy-paste this JSON into <a href="https://jsonformatter.curiousconcept.com/">this website</a> to view it interactively.</p>

<p>This JSON defines a grocery order, showing the order’s ID, the user who ordered it, the items he ordered, and the delivery details.</p>

<p>You can access JSON attributes using 2 notations:</p>

<h3 id="dot-notation">Dot Notation:</h3>

<p>If the above JSON was saved to a variable called <code class="language-plaintext highlighter-rouge">obj</code>, you can access its attributes by chaining dots: 
The <code class="language-plaintext highlighter-rouge">obj.order.id</code> will evaluate to the int <code class="language-plaintext highlighter-rouge">1</code> and <code class="language-plaintext highlighter-rouge">obj.order.user.name</code> will evaluate to the string <code class="language-plaintext highlighter-rouge">John Smith</code>.</p>

<h3 id="accessor-notation">Accessor Notation:</h3>

<p>Some languages (ie. Python) uses the notation <code class="language-plaintext highlighter-rouge">object["attribute"]</code> to denote attribute access. So for the example above, the 
equivalent would be <code class="language-plaintext highlighter-rouge">obj["order"]["id"]</code> and <code class="language-plaintext highlighter-rouge">obj["order"]["user"]["name"]</code>.</p>

<h3 id="accessing-lists-elements">Accessing Lists Elements</h3>

<p>Notice how the <code class="language-plaintext highlighter-rouge">order.items</code> attribute is a JSON list of JSON objects. Lists are ordered data structures, and we access their 
elements by using the index of the element. So to access the first element, we would do:</p>

<div class="language-plaintext highlighter-rouge"><div class="highlight"><pre class="highlight"><code>obj.order.items[0]
</code></pre></div></div>

<p>or</p>

<div class="language-plaintext highlighter-rouge"><div class="highlight"><pre class="highlight"><code>obj["order"]["items"][0]
</code></pre></div></div>

<p>JSON Lists are 0-based indexed, so for a list of size N, the first element is always <code class="language-plaintext highlighter-rouge">obj[0]</code> and the last is always <code class="language-plaintext highlighter-rouge">obj[N-1]</code>.</p>

<h3 id="style-choice">Style Choice</h3>

<p>Both of these mean the same thing, the difference is the style choice, which is usually determined by the language 
you’re using or the software that is evaluating your input.</p>

<p>Dot Notation:</p>
<div class="language-plaintext highlighter-rouge"><div class="highlight"><pre class="highlight"><code>obj.order.items[0].name

^ This evaluates to "Avocado"
</code></pre></div></div>

<p>Accessor Notation</p>

<div class="language-plaintext highlighter-rouge"><div class="highlight"><pre class="highlight"><code>obj["order"]["items"][1]["name"]

^ This evaluates to "Banana"
</code></pre></div></div>

<p>Okay enough JSON, back to HTTP and APIs.</p>

<h1 id="parameters-of-http-requests">Parameters of HTTP Requests</h1>

<p>If we wanted to get a specific resource, we would need to ask for it specifically, using it’s <code class="language-plaintext highlighter-rouge">id</code> attribute.
The format depends on how the API creator designed: it could be a number like <code class="language-plaintext highlighter-rouge">12345</code> or some string like <code class="language-plaintext highlighter-rouge">user_12345</code>.</p>

<p>To do so, the API would expose an endpoint like this:</p>

<div class="language-plaintext highlighter-rouge"><div class="highlight"><pre class="highlight"><code>https://p1xy94s1ni.execute-api.us-east-1.amazonaws.com/dev/events/&lt;event_id&gt;
</code></pre></div></div>

<p>Or sometimes expressed like this:</p>

<div class="language-plaintext highlighter-rouge"><div class="highlight"><pre class="highlight"><code>https://p1xy94s1ni.execute-api.us-east-1.amazonaws.com/dev/events/{event_id}
</code></pre></div></div>

<p>In this case, <code class="language-plaintext highlighter-rouge">&lt;event_id&gt;</code> is the placeholder for the ID argument. So to get a specific resource, we could get:</p>

<div class="language-plaintext highlighter-rouge"><div class="highlight"><pre class="highlight"><code>GET https://p1xy94s1ni.execute-api.us-east-1.amazonaws.com/dev/events/1
</code></pre></div></div>

<p>Notice how the top level object in the response is now a singular JSON object rather than a list.</p>

<p>These parameters that form part of our “path to our resource” are called Path Parameters. Easy enough. We can have
path parameters in multiple levels of our path, like this:</p>

<div class="language-plaintext highlighter-rouge"><div class="highlight"><pre class="highlight"><code>https://facebook.com/api/groups/12/members/3
</code></pre></div></div>

<p>This tells us “get group with <code class="language-plaintext highlighter-rouge">id=12</code>, get its members, and return the one with <code class="language-plaintext highlighter-rouge">id=3</code>. So the output should be a single 
User object.</p>

<p>For the sake of brevity, and as is common, sometimes people remove the protocol + domain from the URL when discussing a single domain.</p>

<p>So for example, instead of always saying:</p>

<div class="language-plaintext highlighter-rouge"><div class="highlight"><pre class="highlight"><code>GET https://facebook.com/api/groups/12/members/3
</code></pre></div></div>

<p>I can just say:</p>

<div class="language-plaintext highlighter-rouge"><div class="highlight"><pre class="highlight"><code>GET /api/groups/12/members/3
</code></pre></div></div>

<p>Since we know the protocol and domain in question. To be clear, this is just a notation shorthand, and if you try to search for 
just <code class="language-plaintext highlighter-rouge">/api/groups/12/members/3</code>, you’ll get an error. From here on, I’m going to use this shorthand to discuss making requests 
against an imaginary API domain.</p>

<p>Path Parameters form part of the path to the resource in question. However, there is one other type of parameter that you may 
notice called Query Parameters. These are parameters <strong>are not part of the path</strong>, so they don’t affect <em>which</em> resource we’re 
requesting, but rather give us additional information on <em>how</em> to search the resource.</p>

<p>Remember how we said that <code class="language-plaintext highlighter-rouge">GET /base/path/to/resource</code> is a list operation? So for example, <code class="language-plaintext highlighter-rouge">GET /api/groups/12/members</code> 
will list all the members in group 12, and in order to get a specific member, we access that member with their id: 
<code class="language-plaintext highlighter-rouge">GET /api/groups/12/members/3</code>.</p>

<p>So for list operations, you may want to apply certain criteria, filters, or sorting, etc. It’s usually infeasable for an API 
to return <em>all</em> of a particular resource: imagine receiving every single Twitter Tweet: <code class="language-plaintext highlighter-rouge">GET /api/tweets</code>. 
The amount of data is huge, so instead we pass Query Parameters to limit the query. Query Parameters are separated from 
the main path in the URL by a question mark <code class="language-plaintext highlighter-rouge">?</code>. Query Parameters are key-value pairs, expressed with an equal sign <code class="language-plaintext highlighter-rouge">=</code>, 
and are separated from other Query Parameters by an ampersand <code class="language-plaintext highlighter-rouge">&amp;</code>. Here’s an example:</p>

<div class="language-plaintext highlighter-rouge"><div class="highlight"><pre class="highlight"><code>GET /api/groups/12/members?limit=8&amp;sort_by=age&amp;order=asc
</code></pre></div></div>

<p>When this gets parsed out, the browser sees this as:</p>

<ul>
  <li><code class="language-plaintext highlighter-rouge">/api/groups/12/members</code> the path to the Members resource</li>
  <li><code class="language-plaintext highlighter-rouge">?</code> - the delimiter that separates the path and the Query Parameters</li>
  <li>
    <p><code class="language-plaintext highlighter-rouge">limit=8&amp;sort_by=age&amp;order=asc</code> the Query Parameters section, which can be broken down per Query Param:</p>

    <ul>
      <li><code class="language-plaintext highlighter-rouge">limit = 8</code></li>
      <li><code class="language-plaintext highlighter-rouge">sort_by = age</code></li>
      <li><code class="language-plaintext highlighter-rouge">order = desc</code></li>
    </ul>
  </li>
</ul>

<p>Now the server knows that we want to see only the 8 oldest Members of the Group with ID = 12.</p>

<p>As always, the API creator determines which Query Parameters are available for which routes, their types, and how they work. 
A good rule of thumb for working with APIs is to just use their documentation directly - it will show all this information.</p>

<p>One point of note here is that, even if we request this:</p>

<div class="language-plaintext highlighter-rouge"><div class="highlight"><pre class="highlight"><code>GET /api/groups/12/members?limit=1&amp;sort_by=age&amp;order=asc
</code></pre></div></div>

<p>Notice now that we’re requesting <code class="language-plaintext highlighter-rouge">limit = 1</code>, meaning we expect only 1 object in the response. However, the response will 
still contain a list of users, but with a single User object in it, as shown above. This is sometimes a common gotcha.</p>

<h3 id="response-structure">Response Structure</h3>

<p>Usually the HTTP Response will contain some sort of metadata about the response. For example, if we’re querying some list, 
the resulting dataset may be too large even with query parameters. Imagine requesting for all Events where the Packers are playing:</p>

<div class="language-plaintext highlighter-rouge"><div class="highlight"><pre class="highlight"><code>GET /api/search/upcoming_events?team=packers
</code></pre></div></div>

<p>A common pattern is for the HTTP Response to include some sort of “page data”, meaning how many total results it found, 
and may only include the data for a limited subset of those results. The metadata would then include a sort of “cursor” ID 
value, allowing you to “paginate” through this query to access the rest of the results. Here’s an example response format:</p>

<div class="language-json highlighter-rouge"><div class="highlight"><pre class="highlight"><code><span class="p">{</span><span class="w">
  </span><span class="nl">"data"</span><span class="p">:</span><span class="w"> </span><span class="p">[</span><span class="w">
    </span><span class="err">...</span><span class="w"> </span><span class="mi">100</span><span class="w"> </span><span class="err">JSON</span><span class="w"> </span><span class="err">objects</span><span class="w"> </span><span class="err">here</span><span class="w"> </span><span class="err">...</span><span class="w">
  </span><span class="p">],</span><span class="w">
  </span><span class="nl">"total"</span><span class="p">:</span><span class="w"> </span><span class="mi">69420</span><span class="p">,</span><span class="w">
  </span><span class="nl">"cursor_end"</span><span class="p">:</span><span class="w"> </span><span class="s2">"114"</span><span class="w">
</span><span class="p">}</span><span class="w">
</span></code></pre></div></div>

<p>In this scenario, to get the next 100 results, you’d made the exact same request but with a Query Parameter denoting the cursor value:</p>

<div class="language-plaintext highlighter-rouge"><div class="highlight"><pre class="highlight"><code>GET /api/search/upcoming_events?team=packers&amp;cursor_start=114
</code></pre></div></div>

<p>This example illustrates:</p>

<ul>
  <li>IDs of objects should not be expected to be sequential: there are 100 elements, but the highest element ID is <code class="language-plaintext highlighter-rouge">114</code>.</li>
  <li>The Query Parameter for the cursor should not be expected to be the same key name as the response, ie. <code class="language-plaintext highlighter-rouge">cursor_end</code> vs. <code class="language-plaintext highlighter-rouge">cursor_start</code>.</li>
</ul>

<p>In turn, the next HTTP Response would include the next 100 objects, and an updated cursor value for the next batch of 100, etc.</p>

<h1 id="post-requests">POST Requests</h1>

<p>It’s useful to submit data sometimes, not just to consume it. For example, if you want to use Facebook’s API to create a new Group.</p>

<p>To submit data, we use POST Requests. These are different from GET Requests in that they include a Request Body, in 
addition to their URL.</p>

<p><em>(To follow along for this section, feel free to download the Postman tool - it helps you make HTTP Requests: https://www.postman.com/downloads/)</em></p>

<p>So an example POST Request would look like:</p>

<pre><code class="language-JSON">POST /api/groups

Body: {
    "name": "My Awesome Group",
    "max_members": 50,
    "require_approval": true,
}
</code></pre>

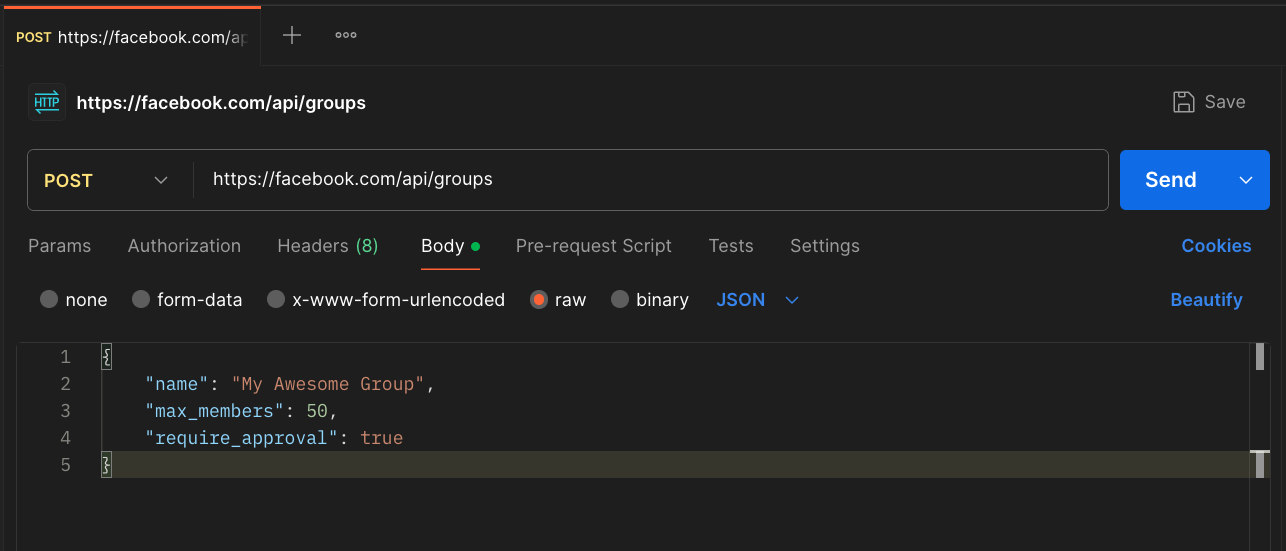
<p>Here’s how this would look in Postman:</p>

<ul>
  <li>Set the Request method to <code class="language-plaintext highlighter-rouge">POST</code></li>
  <li>Place the full protocol + domain + path in the URL</li>
  <li>You’ll see a list of tabs below the URL including Params (which are our Query Params!) - go to Body</li>
  <li>Select <code class="language-plaintext highlighter-rouge">raw</code> -&gt; change the type from <code class="language-plaintext highlighter-rouge">Text</code> to <code class="language-plaintext highlighter-rouge">JSON</code></li>
  <li>Paste the JSON object directly into the body field</li>
</ul>

<p><img src="/dev-blog/assets/images/postman_post_request.png" /></p>

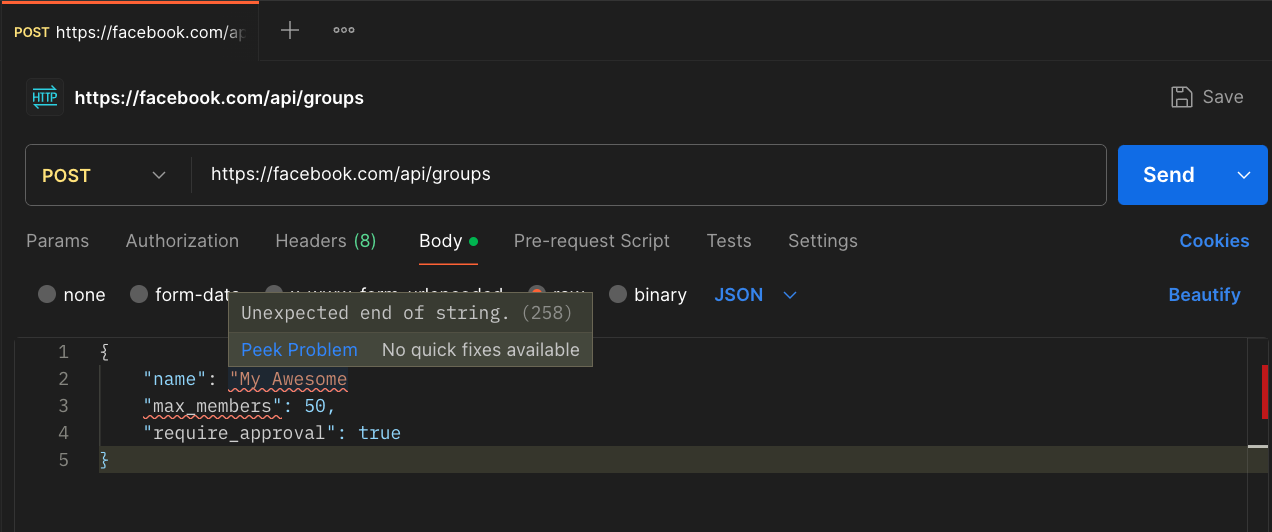
<p>If you change the Body to be invalid JSON, Postman will show you an error. For example, I removed 
the closing quote mark from the name value:</p>

<p><code class="language-plaintext highlighter-rouge">"name": "My Awesome</code></p>

<p><img src="/dev-blog/assets/images/postman_error_body.png" /></p>

<p>Obviously this won’t work because I made up a fake API endpoint. Facebook’s documentation shows you how 
to actually list and create groups.</p>

<p>Here’s a really fun Pokemon API you can use to practice: https://pokeapi.co/. Try to read the 
documentation and make requests in Postman.</p>

<h1 id="responses">Responses</h1>

<p>The last subject we’ll cover is Responses, specifically Response Status Codes.</p>

<p>An HTTP Response will include a “Status Code”, which is a number that denotes the status of the operation. 
If the code is 200, that means all good! You might also recognize 404, which means “Resource not found”; this could be 
because I tried to access <code class="language-plaintext highlighter-rouge">GET /api/users/99</code> but there is no user with ID = 99.</p>

<p>Here’s a general breakdown of Status Codes:</p>

<ul>
  <li>Successful Responses (<code class="language-plaintext highlighter-rouge">200</code>-<code class="language-plaintext highlighter-rouge">299</code>)</li>
  <li>Redirect message (<code class="language-plaintext highlighter-rouge">300</code>-<code class="language-plaintext highlighter-rouge">399</code>)</li>
  <li>Client Error Response (<code class="language-plaintext highlighter-rouge">400</code>-<code class="language-plaintext highlighter-rouge">499</code>)</li>
  <li>Server Error Response (<code class="language-plaintext highlighter-rouge">500</code>-<code class="language-plaintext highlighter-rouge">599</code>)</li>
</ul>

<p>Most of the time, it falls into these specific status codes, which are worth memorizing:</p>

<ul>
  <li><code class="language-plaintext highlighter-rouge">200</code>: Success</li>
  <li><code class="language-plaintext highlighter-rouge">400</code>: Bad Request (meaning the requestor messed something up: a misspelled Query Parameter or something)</li>
  <li><code class="language-plaintext highlighter-rouge">404</code>: Not Found (the request was correct but the requested resource doesn’t exist)</li>
  <li><code class="language-plaintext highlighter-rouge">429</code>: Too Many Requests (you might see this if you spam the Send button and get rate limited)</li>
  <li><code class="language-plaintext highlighter-rouge">500</code>: Server Error (this means the server broke …and you’ve discovered a potential hack! Or their developers don’t get paid enough…)</li>
</ul>

<h1 id="conclusion">Conclusion</h1>

<p>In this article we covered a lot: how URLs are parsed, HTTP Request types, how JSON works, how to GET and POST data to 
a server, and how to understand the response code. These tools will give you the basis for how to write a program that 
programmatically constructs requests and parses the results.</p>

<p>There are tons of other articles and documents to go from here, just look around. But now you know the basics. 
One good resource I’d recommend if you want to go very deep is the Mozilla Developer Network: https://developer.mozilla.org/en-US/docs/Web/HTTP/Guides/Session.</p>

<p>Happy data-ing!</p>]]></content><author><name>Yuval Timen</name></author><category term="tech" /><summary type="html"><![CDATA[So you want to use APIs to programmatically collect data? Sounds great! First it’s good to note that there are many types of APIs, so when we talk about “an API”, we are usually talking about a specific company’s API, such as “the Twitter API”, or “the TicketData API”. Most web products provide an API, which is a way to expose and interact with the contents of a database in a safe and efficient way.]]></summary></entry><entry><title type="html">Generalizing the Monty Hall Problem</title><link href="/dev-blog/2025/12/22/monty-hall-problems.html" rel="alternate" type="text/html" title="Generalizing the Monty Hall Problem" /><published>2025-12-22T14:34:01+00:00</published><updated>2025-12-22T14:34:01+00:00</updated><id>/dev-blog/2025/12/22/monty-hall-problems</id><content type="html" xml:base="/dev-blog/2025/12/22/monty-hall-problems.html"><![CDATA[<p>The Monty Hall Problem comes up a lot in popular culture. It’s often used as a prime example of illogical 
thinking, such as in the movie 21 with Kevin Spacey and James Sturgess. It illustrates the unintuitive nature of probability 
and rational thinking. It seems like people still are unclear what the right answer is. And even those who know the right 
answer will often give an incorrect reason why it’s the right answer. Let’s start by understanding what the problem is.</p>

<p>The usual formulation of the Monty Hall Problem goes something like this:</p>

<blockquote>
  <p>You are a contestant on a game show. 
The host shows you 3 closed doors. 
The host claims that behind one of the doors lies a brand new car! 
However, behind the other 2 doors lie worthless sheep. 
Your goal is to guess which door contains the car.
Once you guess a door, the host (knowing where the car and sheep are located) will open one of the doors that you have not picked to reveal a sheep.
Your choice now becomes: should you stay with your original choice, or switch your choice once a sheep has been revealed?</p>
</blockquote>

<!-- excerpt-start -->
<p>This game implicitly assumes that you value cars more than you value sheep…
<!-- excerpt-end -->
probably a safe assumption, but as good mathematicians we should make our assumptions explicit!</p>

<p>Despite the vibrant debate around whether to change your original choice, it is a mathematical fact that you SHOULD switch your answer. 
However, I’ve seen many reasons that people use to justify their decision to switch their choice that are incorrect. 
So I wanted to start by addressing some of these common misconceptions, then explaining the true answer, and then generalizing the Monty Hall Problem in its entirety.</p>

<p>This will be a math-heavy post, so see the conclusion section if you hate math (boooo!) but love answers.</p>

<h2 id="common-misconceptions">Common Misconceptions</h2>

<h3 id="your-odds-increase-from-33-to-50">Your Odds Increase From 33% To 50%</h3>

<p>The most common wrong justification I’ve seen has been that in the first choice, your chance of being right is 33% but 
after a single sheep is revealed, the choice boils down to a 50% chance of being right.</p>

<p>The reason this is wrong is because these are not 2 independent choices. In fact, this answer assumes you make 2 
decisions but in fact the Monty Hall Problem offers you only 1 true decision: whether to stay or switch.
Your first choice of door is done with no information, meaning your guess is exactly that - a guess. 
Your chance of being right originally is in fact 33%. Well, actually it’s 1/3 (which is slightly more than 33%, so 
from here on out, I will be using fractions for the sake of accuracy).</p>

<p>So the only choice you have is to stay or to switch, since the game essentially forces you into a random door choice at first. 
But this misconception assumes you actually make a new, independent choice between the two remaining doors after the reveal. 
We will see exactly why this is the case when we go over the explanation.</p>

<h1 id="the-explanation">The Explanation</h1>

<p>So if the correct answer is to switch after the sheep is revealed… why? Why is it the case? And more so, why is it the
case if none of the above reasons are the <em>correct</em> reason to switch?</p>

<p>Let’s go back to the essence of the problem: you are faced with not two choices but just one. 
That choice is whether to switch or to stay after the door has been revealed.</p>

<p>The best way to understand intuitively why you should switch is by sketching out a decision matrix for the game.</p>

<p>We differentiate between the 2 sheep just for the sake of illustration. 
The numbers inside of the Stay and Switch strategies indicate the odds of winning the prize given that combination of strategy and original pick. 
Let’s take a look:</p>

<table>
  <thead>
    <tr>
      <th>Original Pick</th>
      <th>Stay</th>
      <th>Switch</th>
    </tr>
  </thead>
  <tbody>
    <tr>
      <td>Car</td>
      <td>1</td>
      <td>0</td>
    </tr>
    <tr>
      <td>Sheep 1</td>
      <td>0</td>
      <td>1</td>
    </tr>
    <tr>
      <td>Sheep 2</td>
      <td>0</td>
      <td>1</td>
    </tr>
  </tbody>
</table>

<p>First let’s just focus on the “Stay” strategy. Since we are staying with our first choice, then it comes down to how lucky 
we get. If we happened to pick the car we were in luck! If we picked one of the two sheep, well… hope you like shepherd’s pie.
So there’s 1 case out of 3 that we win and 2 cases out of 3 that we lose. We can model this as the “Probability of 
winning the prize given that we stay”:</p>

\[P(prize | stay) = \frac{1}{3}\]

<p>However, if we look at the “Switch” strategy, things change a bit. Our strategy says that after the host reveals a door,
we switch our choice to the last remaining door.  There’s really two scenarios in this strategy:</p>

<ol>
  <li>We happened to pick the car first. In this case, there’s a 0% chance of winning, since we picked the car, and after the host’s reveal, we switch <strong>away</strong> from the car to one of the sheep. Womp womp.</li>
  <li>We happened to pick one of the sheep first. In this case there’s a 100% chance of winning. Think about it like this: If at first we pick Sheep 1, and then the host reveals Sheep 2, the only thing left to switch to is the car - woohoo!</li>
</ol>

<p>Since choosing either one of the sheep randomly at first results in the same outcome - the other of the two sheep being 
revealed and the car remaining as the only door to switch to - then the odds of winning are the same given the initial 
choice of either sheep. So since there’s 2 cases  the “Probability of winning the prize given that we switch” is:</p>

\[P(prize | switch) = \frac{2}{3}\]

<p>Finally, to inform our strategy we can set up a simple inequality:</p>

\[P(prize | switch) &gt; P(prize | stay)\]

<p>And therefore, we should always switch our choice after the host reveals the door! As you can see, it’s not a 50% 
chance of winning after the host reveals a sheep, but rather it’s a 2/3 chance of winning <em>given that you always switch</em>. 
The odds of winning are a function of the only true choice you have (ie. switching or staying) rather than the odds you 
happen to pick the car or the sheep.</p>

<h1 id="generalizing-the-problem">Generalizing The Problem</h1>

<p>Okay, so the original formulation is pretty simple: three doors, one car, two sheep, and one door revealed. But as any 
mathematician would tell you, an answer isn’t satisfying unless it’s generalized - preferably with many variables and 
complex-looking symbols. So let’s go ahead and derive a generalized answer. But first, we should probably formulate a 
generalized problem.</p>

<p>We generalize the problem as follows:</p>

<blockquote>
  <p>You are a contestant on a game show. 
The host shows you N closed doors. 
The host claims that behind M of the doors lies a brand new car! 
However, behind the other N-M doors lie worthless sheep. 
Your goal is to guess which door(s) contain a car.
Once you guess a door, the host (knowing where the car(s) and sheep are located) will open S of the doors that you have not picked to reveal a sheep.
Your choice now becomes: should you stay with your original choice, or switch your choice once S sheep have been revealed?</p>
</blockquote>

<p>So we have N doors, M of which contain the prize (cars), and the remaining doors contain sheep. Once you pick an initial door, 
the host will reveal S of the doors to show sheep, and you are presented the choice of whether to stay with your original door 
or to switch to one of the remaining doors. This introduces a few implicit constraints:</p>

<p><code class="language-plaintext highlighter-rouge">The number of doors, the number of cars and the number of reveals must all be positive integers.</code></p>

\[N, M, S \in \mathbb{N}\]

<p><code class="language-plaintext highlighter-rouge">There must be at least enough sheep to allow the host to reveal S of them, even if the contestant had originally picked a sheep.</code></p>

\[N - M &gt; S \implies S &lt; N - M\]

<p>How do we model the probabilities given these new parameters?</p>

<p>It might be helpful to pick a couple of parameterizations and observe how the probabilities emerge to see if we can pick 
up any patterns. Let’s start with the following scenario:</p>

<p>Five doors, two prizes, one reveal
(<code class="language-plaintext highlighter-rouge">N = 5, M = 2, S = 1</code>)</p>

<table>
  <thead>
    <tr>
      <th>Original Pick</th>
      <th>Stay</th>
      <th>Switch</th>
    </tr>
  </thead>
  <tbody>
    <tr>
      <td>Car 1</td>
      <td>1</td>
      <td>1/3</td>
    </tr>
    <tr>
      <td>Car 2</td>
      <td>1</td>
      <td>1/3</td>
    </tr>
    <tr>
      <td>Sheep 1</td>
      <td>0</td>
      <td>2/3</td>
    </tr>
    <tr>
      <td>Sheep 2</td>
      <td>0</td>
      <td>2/3</td>
    </tr>
    <tr>
      <td>Sheep 3</td>
      <td>0</td>
      <td>2/3</td>
    </tr>
  </tbody>
</table>

<p>Since there are 2 cars and 5 total doors, then the “Probability of winning the prize given that we stay” is:</p>

\[P(prize | stay) = \frac{2}{5}\]

<p>As for if we take the “switch” strategy, there is again two scenarios.</p>

<ol>
  <li>We happened to pick a car first. In this case, there’s a 1/3 chance of winning. This is because our initial choice has taken one of the two cars out of the pool of possible selections, and the host’s reveal removes one of the sheep from the pool. So a switch would leave us with 1 car and 2 sheep left, meaning a 1/3 chance of picking the remaining car and a 2/3 chance of picking one of the remaining sheep.</li>
  <li>We happened to pick one of the sheep first. In this case there’s a 2/3 chance of winning. This is because our initial choice has taken one of our three sheep out of the pool, and the host’s selection has removed another sheep from the pool. So a switch would leave us with both cars and one sheep, meaning a 2/3 chance of picking one of the remaining cars, and a 1/2 chance of picking the remaining sheep.</li>
</ol>

<p>These are conditional probabilities, so to find the total probability we should weigh them by the contributions they make to the overall probability.
In 2 of the 5 cases, we have a 1/3 chance of winning, in 3 of the 5 cases we have a 2/3 chance of winning. 
We find the average probability of winning by summing these conditional probabilities and dividing by the total number of cases:</p>

\[P(prize | switch) = \frac{1}{5} \times [2  \times \frac{1}{3} + 3 \times \frac{2}{3}]\]

\[P(prize | switch) = \frac{1}{5} \times [\frac{2}{3} + \frac{6}{3}]\]

\[P(prize | switch) = \frac{1}{5} \times \frac{8}{3}\]

\[P(prize | switch) = \frac{8}{15}\]

<p>And our inequality again informs us to choose the “switch” strategy:</p>

\[P(prize | switch) = \frac{8}{15} &gt;  P(prize | stay) = \frac{2}{5} = \frac{6}{15}\]

<p>How about if we change S, the number of reveals? The max value for S based on our 2nd constraint, given N and M, would be 2.</p>

<p>Five doors, two prizes, two reveals
(<code class="language-plaintext highlighter-rouge">N = 5, M = 2, S = 2</code>)</p>

<table>
  <thead>
    <tr>
      <th>Original Pick</th>
      <th>Stay</th>
      <th>Switch</th>
    </tr>
  </thead>
  <tbody>
    <tr>
      <td>Car 1</td>
      <td>1</td>
      <td>1/2</td>
    </tr>
    <tr>
      <td>Car 2</td>
      <td>1</td>
      <td>1/2</td>
    </tr>
    <tr>
      <td>Sheep 1</td>
      <td>0</td>
      <td>1</td>
    </tr>
    <tr>
      <td>Sheep 2</td>
      <td>0</td>
      <td>1</td>
    </tr>
    <tr>
      <td>Sheep 3</td>
      <td>0</td>
      <td>1</td>
    </tr>
  </tbody>
</table>

<p>Again, the “Probability of winning the prize given that we stay” is:</p>

\[P(prize | stay) = \frac{2}{5}\]

<p>This doesn’t change, no matter how many doors are revealed, even if S = 0.</p>

<p>Considering the “switch” strategy, let’s examine our two scenarios:</p>

<ol>
  <li>We happened to pick a car first. In this case, there’s a 1/2 chance of winning. This is because our initial choice has taken one of the two cars out of the pool of possible selections, and the host’s reveal removes two of the sheep from the pool. So a switch would leave us with 1 car and 1 sheep left, meaning a 1/2 chance of picking the remaining car.</li>
  <li>We happened to pick one of the sheep first. In this case there’s a 100% chance of winning. This is because our initial choice has taken one of our three sheep out of the pool, and the host’s two reveals have removed the other two sheep from the pool. So a switch would leave us with only the 2 remaining cars, meaning a 100% chance of winning.</li>
</ol>

<p>Finding the “Probability of winning the prize given that we switch”:</p>

\[P(prize | switch) = \frac{1}{5} \times [2  \times \frac{1}{2} + 3 \times 1]\]

\[P(prize | switch) = \frac{1}{5} \times [1 + 3]\]

\[P(prize | switch) = \frac{1}{5} \times 4\]

\[P(prize | switch) = \frac{4}{5}\]

<p>Obviously it would make sense that revealing <em>two</em> sheep instead of one would give us better odds of winning, since 
it removes more sheep from the pool of possibilities to switch to. Formally, it’s:</p>

\[P(prize | switch) = \frac{4}{5} &gt;  P(prize | stay) = \frac{2}{5}\]

<h1 id="derivations">Derivations</h1>

<p>We now have sufficient information to derive a formula to determine the probabilities. Let’s start with the easy one.</p>

<p>The “Probability of winning the prize given that we stay” is always the same:</p>

\[P(prize | stay) = \frac{M}{N}\]

<p>This passes the sanity check, because regardless of the number of reveals, the probability stays the same - and as we can 
see, the variable S does not appear in the formula. The probability is just the odds of picking a car from the set of choices.</p>

<p>How about the “Probability of winning the prize given that we switch”? I claim that the formula for this probability is:</p>

\[P(prize | switch) = \frac{1}{N} \times (M  \times \frac{M-1}{N-S-1} + (N-M) \times \frac{M}{N-S-1})\]

<p>Let’s quickly explain each term to gain some intuition for why this is the true formula.</p>

<ul>
  <li>There are N equally likely doors to initially choose from, resulting in N equally likely cases. That means that each of these choices contributes 1/N of the probability to the overall result.</li>
  <li>M of these terms result in an (M-1)/(N-S-1) chance of winning given you always switch. The numerator is M-1 because it’s the number of cars remaining minus the car you’ve selected… you can’t “switch” to the door you’ve already chosen! And the denominator is N-S-1 because the total remaining doors to choose from is the total number of doors N minus the number of reveals S minus the door you’ve currently selected.</li>
  <li>The remaining N-M of these cases result in an M/(N-S-1) chance of winning given you always switch, for a very similar reason. The only difference here is that there are all M cars remaining, because in these N-M cases, we’ve initially selected a sheep, not a car. So the numerator is the full M, not M-1. The denominator is still N-S-1 total doors remaining because it’s the total number of doors N minus the number of reveals S minus the door you’ve currently selected.</li>
</ul>

<p>Sounds good so far? Okay now let’s simplify this as much as possible - multiplying the numerators:</p>

\[P(prize | switch) = \frac{1}{N} \times (\frac{M^2-M}{N-S-1} + \frac{NM-M^2}{N-S-1})\]

<p>Combining like terms:</p>

\[P(prize | switch) = \frac{1}{N} \times (\frac{M^2-M+NM-M^2}{N-S-1})\]

<p>The M^2 terms cancel out:</p>

\[P(prize | switch) = \frac{1}{N} \times (\frac{NM-M}{N-S-1})\]

<p>Multiplying the denominator out:</p>

\[P(prize | switch) = \frac{NM-M}{N^2-SN-N}\]

<p>Looks like this is our final formula! To verify, let’s confirm the probabilities of the cases we’ve already manually done above:</p>

<p><code class="language-plaintext highlighter-rouge">N=3, M=1, S=1</code> - ie. the original Monty Hall Problem:</p>

\[P(prize | switch) = \frac{(3)(1)-(1)}{(3)^2-(1)(3)-(3)}\]

\[P(prize | switch) = \frac{2}{3}\]

<p>That checks out! Now let’s try both cases with 5 doors and 2 cars:</p>

<p><code class="language-plaintext highlighter-rouge">N=5, M=2, S=1</code>:</p>

\[P(prize | switch) = \frac{(5)(2)-(2)}{(5)^2-(1)(5)-(5)}\]

\[P(prize | switch) = \frac{8}{15}\]

<p>Okay, looks good. Now for the last one - <code class="language-plaintext highlighter-rouge">N=5, M=2, S=2</code>:</p>

\[P(prize | switch) = \frac{(5)(2)-(2)}{(5)^2-(2)(5)-(5)}\]

\[P(prize | switch) = \frac{4}{5}\]

<p>Very nice! So we now have formulas for the probabilities of each of the strategies. To determine the correct strategy, 
we should check for which parameter boundaries the probability of one is higher than the other. In other words - under which 
conditions is it ever worth it to stay rather than to switch? It would be worth it to stay if the 
“Probability of winning the prize given that we stay” is greater than the “Probability of winning the prize given that we switch”.</p>

\[P(prize | stay) &gt; P(prize | switch)\]

\[\frac{M}{N} &gt; \frac{NM-M}{N^2-SN-N}\]

<p>Let’s factor out a common factor of M/N from the right hand side:</p>

\[\frac{M}{N} &gt; \frac{(M)(N-1)}{(N)(N-S-1)}\]

\[\frac{M}{N} &gt; \frac{M}{N} \times \frac{N-1}{N-S-1}\]

<p>And now we have all the information we need to make a definitive strategy recommendation. If we make the following substitutions:</p>

\[U = \frac{M}{N} ; Z = \frac{N-1}{N-S-1}\]

<p>Then we can reframe the inequality with the following form:</p>

\[U &gt; U \times Z\]

<p>This is always true as long as Z &lt; 0… but if we look at our assumptions, we can see that Z &gt; 0 always:</p>

\[N - M &gt; S \implies N &gt; M + S\]

<p>And so Z is always positive, because if all of N, M, S are natural numbers, then the minimum value of N is (M + S + 1). So 
if we set N = (M + S + 1) then our Z value becomes:</p>

\[Z = \frac{(M + S + 1)-1}{(M + S + 1)-S-1}\]

\[Z = \frac{M + S}{M}\]

<p>Since M and S are natural numbers, then Z &gt; 0. So in this formulation of the problem, it’s always worth it to switch as long as:</p>

<ul>
  <li>there are some natural number of doors N</li>
  <li>there are some natural number of prizes M (where M &lt; N)</li>
  <li>there are enough sheep to allow the host to reveal S of them, even if the contestant had originally picked a sheep (S &lt; N - M)</li>
</ul>

<h2 id="generalizing-further">Generalizing Further</h2>

<p>Some of the astute readers will have noticed that there was one thing we didn’t generalize: the type of revealed door. How 
does the strategy change if the host starts opening S <em>random</em> doors, revealing either a car or a sheep on each of the S reveals?
How many cars will you, the contestant, have to see revealed until you decide it’s actually worth staying with your original door?</p>

<p>Let’s create one final formulation of this generalized Monty Hall Problem:</p>

<blockquote>
  <p>You are a contestant on a game show. 
The host shows you N closed doors. 
The host claims that behind M of the doors lies a brand new car! 
However, behind the other N-M doors lie worthless sheep. 
Your goal is to guess which door(s) contain a car.
Once you guess a door, the host will open S of the doors that you have not picked to reveal either a sheep or a car in each of the S reveals.
Your choice now becomes: should you stay with your original choice, or switch your choice once S doors have been revealed?</p>
</blockquote>

<p>Since we’re mathematicians, we will make this more precise by introducing two new variables:</p>

\[S = B + G\]

<p>S is the total number of reveals made; B is the number of cars revealed (given the variable B for “bad for the contestant”), and G is the total number of sheep revealed (“good for the contestant”).
Naturally, the number of revealed cars + the number of revealed sheep must sum to the number of revealed total doors.</p>

<p>Before we dive into another example, we re-examine the maximum value for S being <code class="language-plaintext highlighter-rouge">N - M - 1</code>. Originally, this was because
we assumed that “There must be at least enough sheep to allow the host to reveal S of them, even if the contestant had 
originally picked a sheep.” However, now we’re revealing sheep and cars. Meaning that our new assumption should be that 
“There must be at most M-1 revealed cars and N-M-1 revealed sheep, so as to allow the contestant a worst case scenario 
choice of choosing between staying with their current door or switching to the last, un-revealed door.”
Since the maximum case revealed scenario involves M-1 revealed cars and N-M-1 revealed sheep, the total revealed number of 
doors is equal to N-2.</p>

\[(M-1) + (N-M-1) \implies M-1+N-M-1 = N - 2\]

<p>N-2 is the new maximum value of S. With N-2 doors revealed, we have N - (N-2) = 2 doors remaining, one of which is the 
door the contestant originally picked, leaving one last door to be switched to, if the contestant so wishes.</p>

<p>Okay, now we can set up another table:</p>

<p>Eight doors, five prizes, two reveals. Let’s check that two reveals is allowed.</p>

\[S_{max} = N - 2 = 6 \implies S &lt; S_{max}\]

<p>(<code class="language-plaintext highlighter-rouge">N = 8, M = 5, S = 2</code>)</p>

<p>The host reveals one car and one sheep.</p>

<p>(<code class="language-plaintext highlighter-rouge">B = 1, G = 1</code>)</p>

<table>
  <thead>
    <tr>
      <th>Original Pick</th>
      <th>Stay</th>
      <th>Switch</th>
    </tr>
  </thead>
  <tbody>
    <tr>
      <td>Car 1</td>
      <td>1</td>
      <td>3/5</td>
    </tr>
    <tr>
      <td>Car 2</td>
      <td>1</td>
      <td>3/5</td>
    </tr>
    <tr>
      <td>Car 3</td>
      <td>1</td>
      <td>3/5</td>
    </tr>
    <tr>
      <td>Car 4</td>
      <td>1</td>
      <td>3/5</td>
    </tr>
    <tr>
      <td>Car 5</td>
      <td>1</td>
      <td>3/5</td>
    </tr>
    <tr>
      <td>Sheep 1</td>
      <td>0</td>
      <td>4/5</td>
    </tr>
    <tr>
      <td>Sheep 2</td>
      <td>0</td>
      <td>4/5</td>
    </tr>
    <tr>
      <td>Sheep 3</td>
      <td>0</td>
      <td>4/5</td>
    </tr>
  </tbody>
</table>

<p>Again, the “Probability of winning the prize given that we stay” is always M/N. Let’s skip to the interesting bit. The 
“Probability of winning the prize given that we switch” is split into two scenarios:</p>

<ol>
  <li>We originally picked one of the 5 cars. After the host reveals one car and one sheep, we have 3 total cars remaining (5 original minus the one we picked, minus one more the host revealed). And we have 5 total doors remaining (8 original minus the one we picked, minus another two the host revealed).</li>
  <li>We originally picked one of the 3 sheep. After the host reveals one car and one sheep, we have 4 total cars remaining (5 original minus the one the host revealed). And we have 5 total doors remaining (8 original minus the one we picked, minus another two the host revealed).</li>
</ol>

<p>For the sake of variety, let’s see how this changes if we keep the same configuration but reveal two cars instead of one car and one sheep.</p>

<p>(<code class="language-plaintext highlighter-rouge">N = 8, M = 5, S = 2</code>)</p>

<p>The host reveals one car and one sheep.</p>

<p>(<code class="language-plaintext highlighter-rouge">B = 2, G = 0</code>)</p>

<table>
  <thead>
    <tr>
      <th>Original Pick</th>
      <th>Stay</th>
      <th>Switch</th>
    </tr>
  </thead>
  <tbody>
    <tr>
      <td>Car 1</td>
      <td>1</td>
      <td>2/5</td>
    </tr>
    <tr>
      <td>Car 2</td>
      <td>1</td>
      <td>2/5</td>
    </tr>
    <tr>
      <td>Car 3</td>
      <td>1</td>
      <td>2/5</td>
    </tr>
    <tr>
      <td>Car 4</td>
      <td>1</td>
      <td>2/5</td>
    </tr>
    <tr>
      <td>Car 5</td>
      <td>1</td>
      <td>2/5</td>
    </tr>
    <tr>
      <td>Sheep 1</td>
      <td>0</td>
      <td>3/5</td>
    </tr>
    <tr>
      <td>Sheep 2</td>
      <td>0</td>
      <td>3/5</td>
    </tr>
    <tr>
      <td>Sheep 3</td>
      <td>0</td>
      <td>3/5</td>
    </tr>
  </tbody>
</table>

<ol>
  <li>We originally picked one of the 5 cars. After the host reveals two cars, we have 2 total cars remaining (5 original minus the one we picked, minus two more the host revealed). And we have 5 total doors remaining (8 original minus the one we picked, minus another two the host revealed).</li>
  <li>We originally picked one of the 3 sheep. After the host reveals two cars, we have 3 total cars remaining (5 original minus the two the host revealed). And we have 5 total doors remaining (8 original minus the one we picked, minus another two the host revealed).</li>
</ol>

<p>Okay, I think we have enough information to create a final formula.</p>

\[P(prize | switch) = \frac{1}{N} \times (M \times \frac{M-B-1}{N-B-G-1} + (N-M) \times \frac{M-B}{N-B-G-1})\]

<p>Let’s again explain each term to gain some intuition for why this is the true formula. The only difference here is that
we’ve substituted the S terms with B + G, and the M terms now are followed by a minus B, to indicate the revealed cars 
we’ve observed that have been removed from the pool:</p>

<ul>
  <li>There are N equally likely doors to initially choose from, resulting in N equally likely cases. That means that each of these choices contributes 1/N of the probability to the overall result.</li>
  <li>M of these terms result in an (M-B-1)/(N-S-1) chance of winning given you always switch. The numerator is M-B-1 because it’s the number of cars remaining minus the B revealed cars minus the car you’ve selected. And the denominator is N-B-G-1 because the total remaining doors to choose from is the total number of doors N minus the number of reveals (S = B + G) minus the door you’ve currently selected.</li>
  <li>The remaining N-M of these cases result in an (M-B)/(N-S-1) chance of winning given you always switch, for a very similar reason. The only difference here is that there are all M cars remaining minus the B cars revealed, because in these N-M cases, we’ve initially selected a sheep, not a car. So the numerator is M-B, not M-B-1. The denominator is still N-B-G-1 total doors remaining because it’s the total number of doors N minus the number of reveals (S = B + G) minus the door you’ve currently selected.</li>
</ul>

<p>Let’s simplify this expression. Multiplying out the numerator:</p>

\[P(prize | switch) = \frac{1}{N} \times (\frac{M^2-BM-M}{N-B-G-1} + \frac{NM-NB-M^2+MB}{N-B-G-1})\]

<p>Combining like terms:</p>

\[P(prize | switch) = \frac{1}{N} \times \frac{NM-NB-M}{N-B-G-1}\]

\[P(prize | switch) = \frac{NM-NB-M}{N^2-NB-NG-N}\]

<p>Again, we inform our strategy by finding where it’s a higher probability to win if we stay than if we switch:</p>

\[P(prize | stay) - P(prize | switch) &gt; 0\]

\[\frac{M}{N} - \frac{NM-NB-M}{N^2-NB-NG-N} &gt; 0\]

<p>Multiplying the leftmost term by 1 to give them a common denominator:</p>

\[\frac{M}{N} \times \frac{N-B-G-1}{N-B-G-1}  - \frac{NM-NB-M}{N^2-NB-NG-N} &gt; 0\]

<p>Simplify:</p>

\[\frac{NM-MB-MG-M}{N^2-NB-NG-N} - \frac{NM-NB-M}{N^2-NB-NG-N} &gt; 0\]

<p>Combine like terms:</p>

\[\frac{NM-MB-MG-M-NM+NB+M}{N^2-NB-NG-N} &gt; 0\]

\[\frac{NB-MB-MG}{N^2-NB-NG-N} &gt; 0\]

<p>We know this expression is greater than 0 when the numerator is greater than 0:</p>

\[NB-MB-MG &gt; 0\]

\[\implies NB &gt; MB + MG\]

\[\implies NB &gt; M (B + G)\]

\[\implies B &gt; \frac{M}{N} \times (B + G)\]

<p>Or in other terms:</p>

\[B &gt; \frac{M}{N} \times S\]

<p>Hmm… so it looks like once we see enough cars revealed, we should actually stay. And “enough” in this case means:</p>

\[\frac{M}{N} \times S\]

<p>How do we interpret this result? You could say that M/N is the “probability of selecting a car”. So in this case “enough” cars
revealed would be when the number of cars revealed exceeds the expected number of cars revealed. For example, if we know that 
there are 8 total doors and 5 cars, and the host will reveal two of them, we would “expect” there to be 5/4 cars:</p>

\[\frac{5}{8} \times 2 = \frac{5}{4}\]

<p>So one car revealed is fine, we should still switch. But once a second car is revealed, we’re better off staying. This actually
makes some sense - the general guidelines for staying with the switching strategy hold until you see an excessive amount of 
cars removed from the pool. Then you should stay with your original guess.</p>

<h2 id="conclusion">Conclusion</h2>

<p>The Monty Hall Problem is an interesting one, because it exposes something about our intuition: we think we’re making 
choices where in fact, we are not. Most people would tell you that the Monty Hall Problem involves two choices, the 
choice of the first door, and the choice of the second door. But in reality, there is no first choice of door. It’s a false 
choice, because you’re forced into it randomly with no information. There is no difference between the contestant choosing the 
door randomly, versus the contestant showing up with a door already picked for them. Thus there is no first choice.</p>

<p>The true choice the contestant makes is <strong>what strategy to adopt</strong>, not what door to choose. This strategy is informed by the 
information they learn during the course of the game. The optimal strategy is the one that maximizes your 
probability of winning… obviously. But the way we formulate that decision comes down to a simple expected value. Based on 
the known proportion of prizes to total doors, we can set an expected number of cars to be revealed. If we observe more than 
expected number of cars, then we’d be better off staying with our initial random choice. If we see less than or equal to the 
expected number of cars, then we’re more likely to win if we take advantage of our newly learned information and switch.</p>]]></content><author><name>Yuval Timen</name></author><category term="statistics" /><summary type="html"><![CDATA[The Monty Hall Problem comes up a lot in popular culture. It’s often used as a prime example of illogical thinking, such as in the movie 21 with Kevin Spacey and James Sturgess. It illustrates the unintuitive nature of probability and rational thinking. It seems like people still are unclear what the right answer is. And even those who know the right answer will often give an incorrect reason why it’s the right answer. Let’s start by understanding what the problem is. The usual formulation of the Monty Hall Problem goes something like this: You are a contestant on a game show. The host shows you 3 closed doors. The host claims that behind one of the doors lies a brand new car! However, behind the other 2 doors lie worthless sheep. Your goal is to guess which door contains the car. Once you guess a door, the host (knowing where the car and sheep are located) will open one of the doors that you have not picked to reveal a sheep. Your choice now becomes: should you stay with your original choice, or switch your choice once a sheep has been revealed? This game implicitly assumes that you value cars more than you value sheep…]]></summary></entry><entry><title type="html">Why The Chicken Crossed The Road: A Response To Rex Evans</title><link href="/dev-blog/2025/09/04/traffic-light-simulation.html" rel="alternate" type="text/html" title="Why The Chicken Crossed The Road: A Response To Rex Evans" /><published>2025-09-04T17:34:01+00:00</published><updated>2025-09-04T17:34:01+00:00</updated><id>/dev-blog/2025/09/04/traffic-light-simulation</id><content type="html" xml:base="/dev-blog/2025/09/04/traffic-light-simulation.html"><![CDATA[<p><img src="/dev-blog/assets/images/crosswalk_image.jpg" style="display:block; margin:0 auto; max-width:100%; height:auto;" /></p>

<p>Re. <a href="https://rexevans.substack.com/p/why-did-the-chicken-cross-the-road">Rex’s Substack: Why did the chicken cross the road?</a></p>

<p><em>(All the code is available on my Github, <a href="https://github.com/yuvaltimen/traffic_light_simulator">here</a>.)</em></p>

<p>So I’ve been thinking about this a lot.</p>

<blockquote>
  <p>In Option 2, you maintain the option to cross the avenue at any light before 45th. So, if you get stopped at a light as you are walking down towards 45th, you can always cross the avenue then and don’t have to wait.</p>
</blockquote>

<p>The argument you’re making here is that it would be better to stay on your side, 
because you can cross the street now and reserve the option to cross 
the avenue when the street crossing is no longer available. You noted 
the assumption that “crossing avenues takes longer than crossing numbered streets”,
but that’s just a function of the size of avenues vs. streets. If avenues were the exact 
same size, this matters less.</p>

<p>There’s also the problem of how many streets and avenues you need to still cross. 
You address the case of when you’re just 1 intersection away, in which case the difference is negligible, 
but I wonder how this works when you’re further away vs. when you’re closing in on the target.</p>

<p>Now, not to get carried away, but cities are complicated places. New York, at least, is mostly uniform in its
layout, but even still has some variation. There’s no guarantee that each city street or avenue will be the same 
size as the others, nor that blocks are evenly spaced. There are some intersections that have less than 4 crosswalks.
Given all this variation, it would be hard to simulate an accurate city. Most cities aren’t even a grid.
So maybe we should simplify the scope a bit and imagine the ideal city. Let’s call it Chickenville, 
staying in the theme of your Substack post.</p>

<h2 id="chickenville-is-the-ideal-city">Chickenville is the ideal city</h2>

<!-- excerpt-start -->
<p>You’ll be thrilled to hear that Chickenville is a mathematically ideal city.
<!-- excerpt-end -->
All of its streets are the same height, 
all of its avenues the same width, and all the blocks are evenly spaced. The city is rectangular, where the south-west corner 
marks the intersection of 1st street and 1st avenue. The streets continue northward, incrementing 1, 2, 3, 4 til infinity. 
And the avenues continue eastward, incrementing 1, 2, 3, 4 til infinity.</p>

<p>Now we can simulate the city. We want to define the start and end locations. In this case, the location is described as a 3-tuple:
<code class="language-plaintext highlighter-rouge">(street, avenue, corner)</code>, where street is the street number, avenue is the avenue name, and corner is one of “northeast”, “northwest”, “southeast”, “southwest”.
(I guess we’re ignoring all restaurants and bars that are not at corners of intersections? Geez, that cuts out a lot of good ones…)</p>

<p>We can then note the following variables:</p>
<ul>
  <li>street block length</li>
  <li>street crosswalk length</li>
  <li>avenue block length</li>
  <li>avenue crosswalk length</li>
  <li>walker speed</li>
  <li>street traffic light cycle time (green time, red time)</li>
  <li>avenue traffic light cycle time (green time, red time)</li>
</ul>

<p>We assume the walker is going at a constant speed and that they can only walk along sidewalks and crosswalks.
This becomes an exercise of counting costs, where the “cost” of a path is the time taken, including both 
time spent walking and time spent waiting for traffic lights.</p>

<p>Let’s do a quick example:</p>

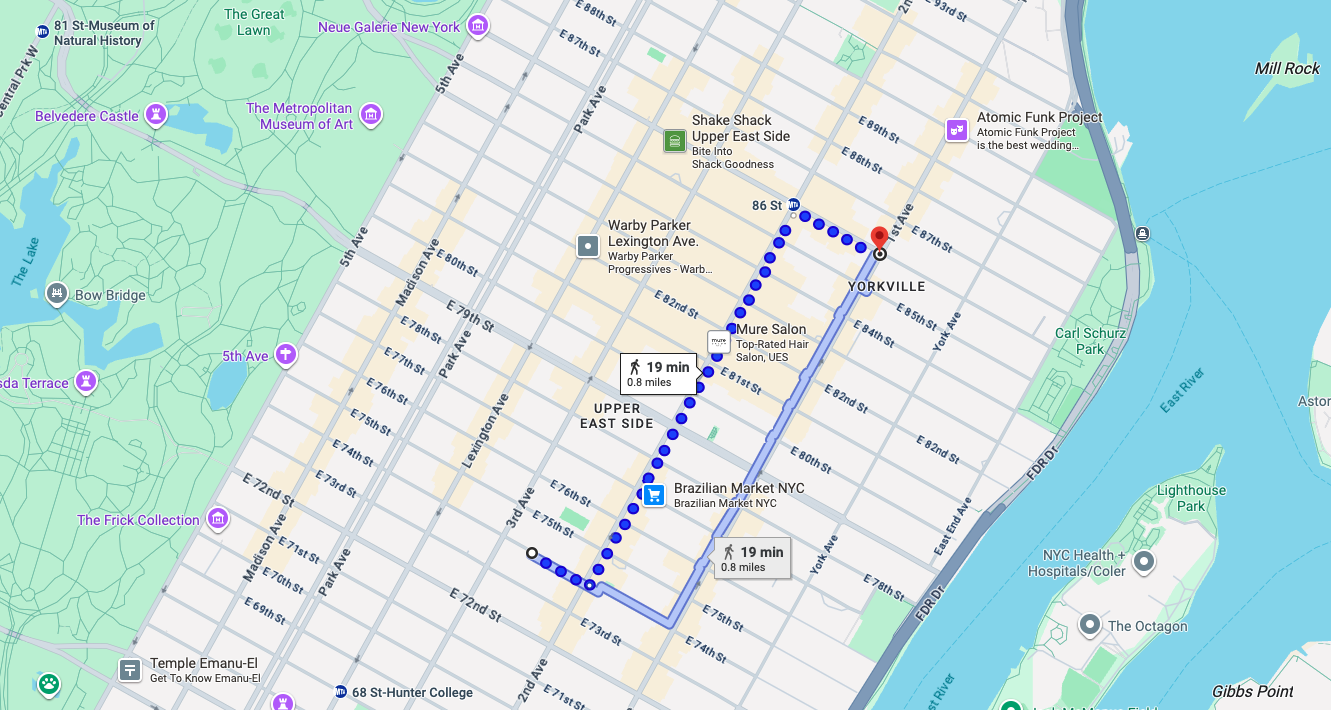
<p><img src="/dev-blog/assets/images/traffic_light_map.png" style="display:block; margin:0 auto; max-width:100%; height:auto;" /></p>

<p>To go from the <code class="language-plaintext highlighter-rouge">southwest corner of 86th st and 1st ave</code> to the <code class="language-plaintext highlighter-rouge">northeast corner of 74th str and 3rd ave</code>, we need to cross:</p>
<ul>
  <li>12 street blocks</li>
  <li>11 street crosswalks</li>
  <li>2 avenue blocks</li>
  <li>1 avenue crosswalk</li>
</ul>

<p>Without traffic lights, given the following parameters (in meters and seconds):</p>
<ul>
  <li>street block length = 15m</li>
  <li>street crosswalk length = 3m</li>
  <li>avenue block length = 30m</li>
  <li>avenue crosswalk length = 5m</li>
  <li>walker speed = 1 m/s</li>
</ul>

<p>it would be:</p>

<p>(12 * 15) + (11 * 3) + (2 * 30) + 5 = <strong>278 seconds</strong> or <strong>4.63 minutes</strong></p>

<p>This would be our “cost” no matter whether we decide to cut straight south until we hit 74th then cut west, 
or whether we zigzag, or whatever.</p>

<p>This, I argue, is the basis for our simulation: cost. We’re essentially just adding line segment distances here.</p>

<p>How do we properly model the traffic light? With nothing less than some good ol’ statistics!</p>

<h2 id="some-good-ol-statistics">Some good ol’ statistics!</h2>

<p>We firstly assume that all street traffic lights have identical light cycle times, and likewise for all avenue traffic lights.
They may or may not be aligned with each other, but 1st avenue’s red won’t be shorter than 2nd or 3rd’s. We’ll assume for now that the 
“initial green” on each traffic light is unknown, and that each cycle is independent.</p>

<p>We can model each crosswalk as being associated with a random variable, which is the time in seconds the walker 
must wait at the red before the green shows. We’ll assume that once the green shows, the walker can successfully cross 
the crosswalk, even if the light cycle is shorter than the time it takes for the walker to clear the distance. 
(Yeesh, have some mercy cars.)</p>

<p>Let’s take an example light cycle to cross an avenue: (green = 10s, red = 15s).</p>

<p>This means that, to cross the street perpendicular to the avenue, the light cycle would be inverted: (green = 15s, red = 10s).</p>

<p>Let’s analyze the time it takes to cros the avenue. Upfront, the probability of arriving at the light when it’s 
green is 10 / (10 + 15) = 0.4 or 40%. However, the other 60% of the time, we don’t necessarily incur the maximum cost
of 15s of waiting, but rather we might have to wait 10s, or only 4s, depending when in the cycle we show up. So we can
treat this like a uniform distribution between 0-15, where in the mean, you’ll have to wait 15/2 = 7.5s. This is the 
expected wait time given we show up to a red light. Now, to integrate both of these facts into a single cost, we can 
combine the cost of either hitting a green, or given a red, the cost of uniformly sampling it.</p>

<p>It would be the weighted probability of both events: so 0.4 * 0s + 0.6 * 7.5s = <strong>4.5s</strong>.</p>

<p>It would be similar, but opposite for analyzing the cost of crossing the street. The probability of hitting the 
green is 15 / (10 + 15) = 0.6 or 60%. The probability of hitting the red is 1 - P(green) = 1 - 0.6 = 0.4 = 40%. 
The expected wait time given we show up at a red light is 10 / 2 = 5s.</p>

<p>So taking the weighted probabilities, we get: 0.6 * 0s + 0.4 * 5s = <strong>2s</strong>.</p>

<p>This is in the limit case, but if you have knowledge of if the upcoming traffic light next green time, it would not be 
the same cost. Now, using just this naive “expected value” of the wait time, let’s calculate what path we should take.</p>

<ul>
  <li>12 street blocks * 15m street block length</li>
  <li>(11 street crosswalks * 3m street crosswalk length) + (11 street crosswalks * 2s expected wait time per street)</li>
  <li>2 avenue blocks * 30m avenue block length</li>
  <li>(1 avenue crosswalk * 5m avenue crosswalk length) + (1 avenue crosswalk * 4.5s expected wait time per avenue)</li>
</ul>

<p>(12 * 15) + (11 * 3) + (11 * 2) + (2 * 30) + (1 * 5) + (1 * 4.5) = <strong>304.5s</strong>!</p>

<p>I’m sure you noticed that this number is the same regardless of the path. The only way we can really take into account the best path 
is to simulate the traffic lights. Instead of taking the expected value, we should actually uniformly sample the red light 
waiting time, and run this simulation enough times to get a significant result.</p>

<p>Enough theory. Let’s do the simulation.</p>

<h2 id="lets-take-a-walk-around-chickenville">Let’s take a walk around Chickenville</h2>

<p>Chickenville is gorgeous this time of year! So you decide to go with your best friend to meet at the bar. 
You meet up at 1st and 1st, on the South-West corner, which is the south-west-est point in all of Chickenville.
The bar is on 5th street and 6th avenue, on the North-West corner. You, in dire need of a drink after this week’s 
layoffs at the firm, decide that the “street” policy is the best way to the bar: if you see a green light to cross the 
avenue, you damn well better take it.</p>

<p>Your friend disagrees, and instead argues for an “avenue” policy, where you should prefer to walk north along 1st avenue
until you hit a red light or until you hit 5th street, and then turn east. He argues that you should “preserve” your 
option to turn east until you really need to use it. It sounds like blasphemy - don’t take the green light to 
cross the avenue? How could that possibly be a better option?</p>

<p>You both decide to run an experiment, whereby you will race! But there’s a catch - the race will be conducted 2,430 times, 
in different circumstances, where the Chickenville City Council has agreed to contribute to your experiment by changing the 
city’s configuration.</p>

<p>The City Council will allow you to run races in each of the following configurations:</p>

<ul>
  <li>Street Block Length: (200m, 500m, 800m)</li>
  <li>Avenue Block Length: (200m, 500m, 800m)</li>
  <li>Street Crosswalk Length: (10m, 30m, 50m)</li>
  <li>Avenue Crosswalk Length: (10m, 30m, 50m)</li>
  <li>Avenue Traffic Cycle Times, denoted as (green seconds, red seconds): (10s, 15s), (15s, 10s), (25s, 30s), (30s, 25s), (50s, 55s), (55s, 50s)</li>
</ul>

<p>In order to ensure the experiment is conducted evenly, they allow you to race 5 times in each given configuration, 
so as to even out the randomness of the traffic light time.</p>

<p>Let’s check that these line up - multiplying the number of configurations we’re trying for each parameter, we get:</p>

<p>3 * 3 * 3 * 3 * 6 * 5 = 2,430</p>

<p>And… we’re off to the races!</p>

<h2 id="the-chickenville-race">The Chickenville race</h2>

<p>Here’s one that shows a clear difference.
In this case, the street policy finished in ~56.55s, and the avenue policy scored a low ~44.38s! 
More than a 10s lead for staying along the avenue!</p>

<p>Your friend is the blue walker with the “avenue” policy, and you are the red walker, preferring the “street” policy.</p>

<p><img src="/dev-blog/assets/gifs/traffic_run_sample_avenue_policy_advantage.gif" style="display:block; margin:0 auto; max-width:100%; height:auto;" /></p>

<p>In this case, the avenue policy (blue) won. But this is just one run that had a significant difference - to see the 
trend, we’ll want to repeat the experiment many times. Well, 2,430 times to be exact!</p>

<h2 id="the-results-are-in">The results are in!</h2>

<p>The experiment was run, so let’s take a look at the breakdown by policy:</p>

<table>
  <thead>
    <tr>
      <th> </th>
      <th>street_policy</th>
      <th>avenue_policy</th>
      <th>green_time</th>
      <th>red_time</th>
    </tr>
  </thead>
  <tbody>
    <tr>
      <td>count</td>
      <td>2,430</td>
      <td>2,430</td>
      <td>2,430</td>
      <td>2,430</td>
    </tr>
    <tr>
      <td>mean</td>
      <td>229.67</td>
      <td>234.60</td>
      <td>30.83</td>
      <td>30.83</td>
    </tr>
    <tr>
      <td>std</td>
      <td>68.83</td>
      <td>71.38</td>
      <td>16.69</td>
      <td>16.69</td>
    </tr>
    <tr>
      <td>min</td>
      <td>66.80</td>
      <td>66.80</td>
      <td>10.00</td>
      <td>10.00</td>
    </tr>
    <tr>
      <td>25%</td>
      <td>178.78</td>
      <td>179.69</td>
      <td>15.00</td>
      <td>15.00</td>
    </tr>
    <tr>
      <td>50%</td>
      <td>256.80</td>
      <td>262.82</td>
      <td>27.50</td>
      <td>27.50</td>
    </tr>
    <tr>
      <td>75%</td>
      <td>269.45</td>
      <td>280.63</td>
      <td>50.00</td>
      <td>50.00</td>
    </tr>
    <tr>
      <td>max</td>
      <td>410.92</td>
      <td>410.92</td>
      <td>55.00</td>
      <td>55.00</td>
    </tr>
  </tbody>
</table>

<p>Looks like the street policy won! 
On average, it took <strong>229.67s</strong>, as opposed to the <strong>234.6s</strong> for the avenue policy - a difference of about 2%.</p>

<h2 id="conclusion">Conclusion</h2>

<p>This simulation probably missed some key factors, so it’s not conclusive. But from the results, the “street” policy 
is actually the more promising one. So next time you’re racing to the bar, you should prefer to cross the avenue 
first if the avenue light is green, rather than “preserving” your option to cross by forgoing the green light.</p>

<p>Cheers!</p>]]></content><author><name>Yuval Timen</name></author><category term="statistics" /><summary type="html"><![CDATA[Re. Rex’s Substack: Why did the chicken cross the road? (All the code is available on my Github, here.) So I’ve been thinking about this a lot. In Option 2, you maintain the option to cross the avenue at any light before 45th. So, if you get stopped at a light as you are walking down towards 45th, you can always cross the avenue then and don’t have to wait. The argument you’re making here is that it would be better to stay on your side, because you can cross the street now and reserve the option to cross the avenue when the street crossing is no longer available. You noted the assumption that “crossing avenues takes longer than crossing numbered streets”, but that’s just a function of the size of avenues vs. streets. If avenues were the exact same size, this matters less. There’s also the problem of how many streets and avenues you need to still cross. You address the case of when you’re just 1 intersection away, in which case the difference is negligible, but I wonder how this works when you’re further away vs. when you’re closing in on the target. Now, not to get carried away, but cities are complicated places. New York, at least, is mostly uniform in its layout, but even still has some variation. There’s no guarantee that each city street or avenue will be the same size as the others, nor that blocks are evenly spaced. There are some intersections that have less than 4 crosswalks. Given all this variation, it would be hard to simulate an accurate city. Most cities aren’t even a grid. So maybe we should simplify the scope a bit and imagine the ideal city. Let’s call it Chickenville, staying in the theme of your Substack post. Chickenville is the ideal city You’ll be thrilled to hear that Chickenville is a mathematically ideal city.]]></summary></entry><entry><title type="html">The Next.js Framework</title><link href="/dev-blog/2025/03/28/nextjs-framework.html" rel="alternate" type="text/html" title="The Next.js Framework" /><published>2025-03-28T15:30:01+00:00</published><updated>2025-03-28T15:30:01+00:00</updated><id>/dev-blog/2025/03/28/nextjs-framework</id><content type="html" xml:base="/dev-blog/2025/03/28/nextjs-framework.html"><![CDATA[<p><img src="/dev-blog/assets/images/nextjs.png" height="150" style="display:block; margin-left:auto; margin-right:auto" /></p>

<p>I’ve recently started using Next.js for a project. I come from the world of Backend, so I’ve encountered a lot of new concepts and I figured I would document my thoughts and learnings here. So let’s dive right in.</p>

<h2 id="how-the-heck-does-frontend-even-work">How The Heck Does Frontend Even Work?</h2>

<p>As a Backend developer, I could talk all day about APIs, horizontal scaling, and database optimization. But when first started working on my latest full-stack project, I realized I was mystified about the workings of the Frontend: the browser, the event loop, async/await, and all the other good stuff that makes a website fun to use.</p>

<p>So in my quest to demystify some of these things, I started learning the Next.js framework. Next.js has a lot of crazy features that jumble a bunch of concepts together. So before diving into Next itself, let’s start with the basics of Frontend.</p>

<h3 id="first---lets-talk-about-web-applciations">First - Let’s Talk About Web Applciations</h3>

<p>If Backend is the world of data storage, transformation, and mutation, then Frontend is the world of user experience and actions. In order to interact with a site’s data, the user uses a web interface, which is typically HTML, CSS, and Javascript. The HTML gives the page a semantic structure - forms, buttons, nested sections, all that fun jazz. The CSS makes 
it pretty by programmatically targeting HTML and applyting styling. And Javascript makes it functional and interactive - it might update the HTML page structure, fetch or submit data, or do some other function.</p>

<p>One very simple way to think about it is: a web app is just software that “listens” to the user clicking around and typing on styled HTML pages.</p>

<p>Each interaction creates an “event”: this can be anything, like a user clicking a button or typing the next letter, or dragging a mouse. Events happen <em>really</em> quickly and the events build up quickly. How do we deal with that?</p>

<p>The answer is - the events just get added to a queue. That’s it. Just pop ‘em on the queue, no sweat! Javascript will churn through the queue for us. <em>(How it’s done is really interesting.<sup>1</sup>)</em></p>

<p>But okay, we know what a web app is now. The Frontend’s job is to be the user interface, and translate user actions into our API verbs that act on our API nouns, all while displaying these concepts back to the user in real time.</p>

<p>So how does it really work?</p>

<h3 id="rendering-patterns">Rendering Patterns</h3>

<p><img src="/dev-blog/assets/images/csr-ssr.png" style="display:block; margin-left:auto; margin-right:auto" /></p>

<p>When the user types in a website URL, DNS will resolve the IP address for the URL and issue a request for the content at that address. The home page for the website in question might be some HTML page with the logo, a quick description, and links to other pages of the website. These would all be <strong>static</strong> assets, meaning they don’t change. They’re not dynamic. How often does the page logo or the link to the “about” page really change? Not very often. So, static assets are really easy to generate once, cache, and spread them around the world in CDNs for quicker distribution.</p>

<p>However it’s not 1999 anymore - we all know that the internet contains much more than just static assets. How do we deal with <strong>dynamic</strong> content? Dynamic content means content that depends on certain parameters - maybe the user can only see their own profile data, maybe the data depends on the time of day, or maybe the page itself is dynamically rendered through search parameters, so some specific subset of a big data list is expected. Since we can’t know this stuff in advance, the client needs to request these things dynamically, then serve it to the user.</p>

<p>This should be straightforward - just request whatever data you want! Problem solved, right?</p>

<p>Not so fast.</p>

<p>If we simply let the client request all the data it wants, this will introduce large latency overheads, as well as multiple round trips to the server. As shown in the diagram above, the client first just fetches the raw HTML with all the styles and scripts linked together. While the client works on fetching the required data, converting it to HTML, and rendering the HTML into a display in the browser, the user is just seeing a blank page. After all the JS executes, the page is finally done loading, and the user will see an interactive web page. In this case, we are letting the client request all the data, which might take multiple round trips. Imaging letting the client request the user info, waiting to receive it, and then using the user’s ID to request the user’s posts, waiting to receive those, and then using the post IDs to request the posts’ comments. That’s too much waiting. The client shouldn’t need to do all that work - we can move that to the server!</p>

<p>The server knows that the client is requesting a certain page, based on parameters, and maybe some authorization headers which identify the user. The server has access to the database or the APIs that we need to fetch the data, so why not save a few network round trips and just request all the data to be displayed before sending it back to the client? That way, the client receives all the HTML fully rendered and doesn’t need to request additional data. As we can see in the diagram, the server can return the HTML page, and then let the client take care of the remaining functionality.</p>

<p>The idea of letting the client do the work is called Client-Side Rendering (CSR), and if we move that work to the server, it’s called Server-Side Rendering (SSR). Both of these methods have their pros and cons, with a fundamental tradeoff between the two: if the HTML is rendered on the server, the client receives fully rendered HTML from the server and the experience is much smoother. But once the client receives the rendered HTML, it would want to interact with it, meaning that we need to have some Javascript in there somewhere. To solve this, we could have the JS “hydrate” the client.</p>

<p>Hydration is actually a really illustrative term here: imagine the server gives the client a dehydrated sponge. The client gets a whole entire sponge! But the sponge isn’t really useable right away, so the client needs to “hydrate” it with water to get it to its correct state. In this case, the dried sponge is the fully-rendered HTML page, and the water that hydrates the sponge is Javascript, which receives the rendered HTML and adds event listeners and other interactivity to it to make the client interactive.</p>

<p>Hydration is a whole topic in itself, so let’s just jump to how Next.js handles hydration for its components.</p>

<h2 id="the-nextjs-framework">The Next.js Framework</h2>
<!-- excerpt-start -->
<p>Next.js gives developers the best of both worlds - fully rendered HTML served to the browser, with the ability to selectively hydrate interactive components.
<!-- excerpt-end --></p>

<p>The key word here is “selective”. Next.js has a neat concept of Server Components and Client Components, which allow developers to choose which parts of their application get rendered on the server, and which get rendered on the client. If you want to build up intuition for React Server Components from first principles, there’s a good article<sup>2</sup> in the References section at the bottom of this article.</p>

<h3 id="the-nextjs-network-boundary">The Next.js Network Boundary</h3>

<p><img src="/dev-blog/assets/images/nextjs-network-boundary.avif" style="display:block; margin-left:auto; margin-right:auto" /></p>

<p>A Next.js app that is deployed non-statically will have a Next.js server, which is just a NodeJS server with some added cruft. The server has access to the database or the APIs or whatever else is needed for the application to serve data. In the above picture, the server exists behind the network boundary, which is a conceptual line separating the client from the server. This image, though very simple, is very important to keep in mind when developing with Next.js.</p>

<p>When writing components or pages in Next.js, the default component will be a Server Component, meaning that the entire component will be pre-rendered on the server. This is very convenient, becuase it allows the developer to use server-side environment variables, APIs, and caches to fetch data, and then render that data directly into HTML.</p>

<p>But what if you need some sort of client-side functionality, like running a callback on a button click? If you try to run the following code in Next.js, you’ll receive a warning:</p>

<div class="language-plaintext highlighter-rouge"><div class="highlight"><pre class="highlight"><code>export default function HomePage() {

    return (
        &lt;div&gt;
            &lt;h1&gt;Home Page&lt;/h1&gt;
            &lt;button onClick={() =&gt; console.log('hello')}&gt;
            Print Hello
            &lt;/button&gt;
        &lt;/div&gt;
    );
}
</code></pre></div></div>

<p>But why? This looks like a perfectly valid React component, right?</p>

<p>Yes, but remember - React Server components are the <strong>default</strong> in Next.js. So client-side functionality like <code class="language-plaintext highlighter-rouge">onClick</code> is not supported on the server. It’s a client action, and must therefore be inside of a Client Component.</p>

<p>Okay… so how do I do that? Easy! Just include the <code class="language-plaintext highlighter-rouge">'use client'</code> directive at the top of the file.</p>

<div class="language-plaintext highlighter-rouge"><div class="highlight"><pre class="highlight"><code>'use client'

export default function HomePage() {

    return (
        &lt;div&gt;
            &lt;h1&gt;Home Page&lt;/h1&gt;
            &lt;button onClick={() =&gt; console.log('hello')}&gt;
            Print Hello
            &lt;/button&gt;
        &lt;/div&gt;
    );
}
</code></pre></div></div>

<p>Great, no more error! But, now what we did was opt the <strong>entire</strong> component into Client-Side Rendering, meaning that the client will need to render out the <code class="language-plaintext highlighter-rouge">div</code> and <code class="language-plaintext highlighter-rouge">h1</code> tags. In this case, it’s a very small amount of work, but in larger applications, we want the server to render as much of the content as it can before passing the torch to the client to finish the job. So how can we accomplish that? Let’s separate out the code into a Client Component and embed it into the Server Component.</p>

<div class="language-plaintext highlighter-rouge"><div class="highlight"><pre class="highlight"><code>// In /app/components/PrintButton.jsx

'use client'

export default function PrintButton() {
    return (
        &lt;button onClick={() =&gt; console.log('hello')}&gt;
        Print Hello
        &lt;/button&gt;
    );
}
</code></pre></div></div>

<div class="language-plaintext highlighter-rouge"><div class="highlight"><pre class="highlight"><code>// In /app/page.jsx

import { PrintButton } from '@/app/components/PrintButton';

export default function HomePage() {

    return (
        &lt;div&gt;
            &lt;h1&gt;Home Page&lt;/h1&gt;
            &lt;PrintButton /&gt;
        &lt;/div&gt;
    );
}
</code></pre></div></div>

<p>Awesome - now Next.js will serve the fully rendered HTML for the home page, except it will leave a placeholder for the <code class="language-plaintext highlighter-rouge">&lt;PrintButton /&gt;</code> component. Then, when the client receives the payload from the server, it will know to inject the Client Component into the correct slot. It does this using the React Server Component (RSC) Payload. This process is really cool and I encourage you all to learn more about it.<sup>3</sup>.</p>

<p>There’s a bunch of nuance as to how best to structure applications and how to nest Client Components inside of Server Components. The main thing to know is that nesting Client Components inside of a Server component is usually what you’ll want. In the outer Server Component, you fetch the data you want, and then render everything into the HTML in the <code class="language-plaintext highlighter-rouge">return</code> block. You can then embed Client Components and pass down the data as props. This is a secure and opaque way to feed data to the client without revealing the underlying API.</p>

<p>However, a common anti-pattern is to embed a Server Component inside of a Client Component. Any component that is imported into a Client Component will itself become a Client Component, so avoid this mistake. There is a package called <code class="language-plaintext highlighter-rouge">server-only</code> that allows you to annotate Server Components to throw errors if it’s ever used in a Client Context.</p>

<p>Although there’s much more to be said on the Client/Server Network Boundary in Next.js, let’s move on to Server Actions, which in my opinion, is the best thing about Next.js.</p>

<h3 id="server-actions">Server Actions</h3>

<p>Next.js makes the Client and Server Components from React pretty easy to use and to reason about. This really helps us read and display data in the most efficient way possible. But as a Backend developer, I’m also interested in creating, updating, and deleting data, rather than just reading it.</p>

<p>Normally, if I wanted to accomplish something like updating a post, I’d create an POST API endpoint and call it from the client, then handle the data refetching on update. But Next.js has one cool new feature that can completely obscure the REST API from the user and make it almost trivial to implement data mutation: Server Actions!</p>

<p>A Server Action is just an async function that’s executed on the server. Sounds simple, but the way Next.js handles them has a lot of nuance, so let’s take a closer look at how they work.</p>

<h3 id="how-to-use-server-actions">How To Use Server Actions</h3>

<p>Let’s define a file called <code class="language-plaintext highlighter-rouge">actions.ts</code> containing one simple Server Action that inserts a row into our database:</p>

<div class="language-plaintext highlighter-rouge"><div class="highlight"><pre class="highlight"><code>// /app/actions/actions.ts

'use server';

export function insertData(formData: FormData) {
    const data = formData.get('data');
    const db = createDbClient(...);
    await db.insert(data);
    revalidatePath('/posts')
};
</code></pre></div></div>

<p>The function itself takes in a formData object, which acts just like a dictionary. As you can see, we insert the data and then call this <code class="language-plaintext highlighter-rouge">revalidatePath</code> function - this is the Server Action’s way of busting the page’s cache. Alternatively, we could <code class="language-plaintext highlighter-rouge">redirect</code> to a different page, return an object, or throw an error which would be handled by the nearest <code class="language-plaintext highlighter-rouge">error.js</code> file.</p>

<p>The <code class="language-plaintext highlighter-rouge">'use server'</code> directive at the top of the file tells Next.js that all exports from the <code class="language-plaintext highlighter-rouge">/app/actions/actions.ts</code> file are Server Actions. This directive should not be confused with the default (ie. empty) Server Component directive; do NOT use <code class="language-plaintext highlighter-rouge">'use server'</code> on Server Components.</p>

<p>Okay, so we created the <code class="language-plaintext highlighter-rouge">insertData</code> Server Action, which will run on the server when invoked, and it has access to all the server data, such as the <code class="language-plaintext highlighter-rouge">createDbClient</code> function in this example. For that reason, Next.js suggests adding validation for authorization on all your Server Actions, and to basically treat them as any other public endpoint. Good to know!</p>

<p>We can now invoke this function from Server or Client Components. Let’s create a button to call the function from the Client side:</p>

<div class="language-plaintext highlighter-rouge"><div class="highlight"><pre class="highlight"><code>'use client';

import { insertData } from '/app/actions/actions.ts';

export default function InsertButton() {
    return (
        &lt;button onClick={() =&gt; insertData('Hello')}&gt;
        Insert 'Hello'
        &lt;/button&gt;
    );
}

</code></pre></div></div>

<p>Alternatively, we can call this action from a form using the <code class="language-plaintext highlighter-rouge">action</code> or <code class="language-plaintext highlighter-rouge">formAction</code> props. This will be left as an exercise to the reader. (Sorry, I read too many math textbooks in college.)</p>

<p>So Server Actions are simple enough to use. But how do they really work?</p>

<h3 id="whats-really-going-on">What’s Really Going On?</h3>

<p><img src="/dev-blog/assets/images/scooby-doo.jpg" height="400" style="display:block; margin-left:auto; margin-right:auto" /></p>

<p>Okay, I’m going to level with you - Server Actions are really just HTTP requests in disguise, meaning their inputs should still be treated as insecure and validated properly. So assuming you’ve secured the Server Action properly, let’s see which measures Next.js takes to enhance security on them. Let’s walk through the lifecycle of a Server Action.</p>

<p>Before deploying your Next.js app, you’ll need to run <code class="language-plaintext highlighter-rouge">npm run build</code>, which will build and bundle the app to make it ready for production. One of the things it does is prune unused Server Actions! This is called dead-code elimination, and is used to prevent public access. All the Server Actions that are referenced by their ID somewhere in the code do get deployed, so part of the build process involves statically securing these Actions.</p>

<p>Next.js claims that it:</p>

<blockquote>
  <p>“creates encrypted, non-deterministic IDs to allow the client to reference and call the Server Action. These IDs are periodically recalculated between builds for enhanced security… The IDs are created during compilation and are cached for a maximum of 14 days. They will be regenerated when a new build is initiated or when the build cache is invalidated. This security improvement reduces the risk in cases where an authentication layer is missing.”</p>
</blockquote>

<p>Fascinating!</p>

<p>Another part of the build process is preparing Client Components for executing Server Actions. Next.js wants to ensure that only the Client Component is able to execute Server Actions, rather than allowing any client, such as Postman or a cURL command. When a Server Action is imported into a Client Component, Next.js will wrap the Server Action with a special wrapper that allows for the request to be properly formatted.</p>

<p>When the Server Action is invoked from the Client (ie. from a form submission of a button click), Next.js serializes the function and its parameters. At this stage, Next.js will actually generate a random, temporary, internal endpoint on which to execute the Action. This endpoint is intended to be unpredictable and is not a public route (ie. not in <code class="language-plaintext highlighter-rouge">/api/*</code>).</p>

<p>Next.js has mechanisms to check the origin, CSRF token, headers, and other aspects of the incoming request, to ensure that it came from the client.</p>

<p>Finally, Next.js will receive the request, deserialize the function and its arguments, and invoke it like a normal server function. The runtime of the Server Action is inherited from the page or layout from which they’re invoked.</p>

<h2 id="conclusion">Conclusion</h2>

<p>Next.js is a powerful Frontend framework that blends React Server-Side and Client-Side Rendering into a hybrid pattern that gives developers the best of both worlds. It uses React Server Actions to simplify data mutation, removing the need for full-sized API endpoints. These Server Actions are secured through a variety of clever means, preventing repeatable attacks against the internal data processing part of the server.</p>

<p>We barely scratched the surface in this blog post, so I’d encourage everyone to try it out themselves. See you all next time!</p>

<h3 id="references">References:</h3>

<ol>
  <li>MDN document on how Javascript <a href="https://developer.mozilla.org/en-US/docs/Web/JavaScript/Reference/Execution_model#concurrency_and_ensuring_forward_progress">ensures forward progress</a></li>
  <li>This deep dive: <a href="https://github.com/reactwg/server-components/discussions/5">RSC From Scratch</a></li>
  <li>This article on the <a href="https://www.smashingmagazine.com/2024/05/forensics-react-server-components/">Forensics of React Server Components</a></li>
</ol>]]></content><author><name>Yuval Timen</name></author><category term="tech" /><summary type="html"><![CDATA[I’ve recently started using Next.js for a project. I come from the world of Backend, so I’ve encountered a lot of new concepts and I figured I would document my thoughts and learnings here. So let’s dive right in. How The Heck Does Frontend Even Work? As a Backend developer, I could talk all day about APIs, horizontal scaling, and database optimization. But when first started working on my latest full-stack project, I realized I was mystified about the workings of the Frontend: the browser, the event loop, async/await, and all the other good stuff that makes a website fun to use. So in my quest to demystify some of these things, I started learning the Next.js framework. Next.js has a lot of crazy features that jumble a bunch of concepts together. So before diving into Next itself, let’s start with the basics of Frontend. First - Let’s Talk About Web Applciations If Backend is the world of data storage, transformation, and mutation, then Frontend is the world of user experience and actions. In order to interact with a site’s data, the user uses a web interface, which is typically HTML, CSS, and Javascript. The HTML gives the page a semantic structure - forms, buttons, nested sections, all that fun jazz. The CSS makes it pretty by programmatically targeting HTML and applyting styling. And Javascript makes it functional and interactive - it might update the HTML page structure, fetch or submit data, or do some other function. One very simple way to think about it is: a web app is just software that “listens” to the user clicking around and typing on styled HTML pages. Each interaction creates an “event”: this can be anything, like a user clicking a button or typing the next letter, or dragging a mouse. Events happen really quickly and the events build up quickly. How do we deal with that? The answer is - the events just get added to a queue. That’s it. Just pop ‘em on the queue, no sweat! Javascript will churn through the queue for us. (How it’s done is really interesting.1) But okay, we know what a web app is now. The Frontend’s job is to be the user interface, and translate user actions into our API verbs that act on our API nouns, all while displaying these concepts back to the user in real time. So how does it really work? Rendering Patterns When the user types in a website URL, DNS will resolve the IP address for the URL and issue a request for the content at that address. The home page for the website in question might be some HTML page with the logo, a quick description, and links to other pages of the website. These would all be static assets, meaning they don’t change. They’re not dynamic. How often does the page logo or the link to the “about” page really change? Not very often. So, static assets are really easy to generate once, cache, and spread them around the world in CDNs for quicker distribution. However it’s not 1999 anymore - we all know that the internet contains much more than just static assets. How do we deal with dynamic content? Dynamic content means content that depends on certain parameters - maybe the user can only see their own profile data, maybe the data depends on the time of day, or maybe the page itself is dynamically rendered through search parameters, so some specific subset of a big data list is expected. Since we can’t know this stuff in advance, the client needs to request these things dynamically, then serve it to the user. This should be straightforward - just request whatever data you want! Problem solved, right? Not so fast. If we simply let the client request all the data it wants, this will introduce large latency overheads, as well as multiple round trips to the server. As shown in the diagram above, the client first just fetches the raw HTML with all the styles and scripts linked together. While the client works on fetching the required data, converting it to HTML, and rendering the HTML into a display in the browser, the user is just seeing a blank page. After all the JS executes, the page is finally done loading, and the user will see an interactive web page. In this case, we are letting the client request all the data, which might take multiple round trips. Imaging letting the client request the user info, waiting to receive it, and then using the user’s ID to request the user’s posts, waiting to receive those, and then using the post IDs to request the posts’ comments. That’s too much waiting. The client shouldn’t need to do all that work - we can move that to the server! The server knows that the client is requesting a certain page, based on parameters, and maybe some authorization headers which identify the user. The server has access to the database or the APIs that we need to fetch the data, so why not save a few network round trips and just request all the data to be displayed before sending it back to the client? That way, the client receives all the HTML fully rendered and doesn’t need to request additional data. As we can see in the diagram, the server can return the HTML page, and then let the client take care of the remaining functionality. The idea of letting the client do the work is called Client-Side Rendering (CSR), and if we move that work to the server, it’s called Server-Side Rendering (SSR). Both of these methods have their pros and cons, with a fundamental tradeoff between the two: if the HTML is rendered on the server, the client receives fully rendered HTML from the server and the experience is much smoother. But once the client receives the rendered HTML, it would want to interact with it, meaning that we need to have some Javascript in there somewhere. To solve this, we could have the JS “hydrate” the client. Hydration is actually a really illustrative term here: imagine the server gives the client a dehydrated sponge. The client gets a whole entire sponge! But the sponge isn’t really useable right away, so the client needs to “hydrate” it with water to get it to its correct state. In this case, the dried sponge is the fully-rendered HTML page, and the water that hydrates the sponge is Javascript, which receives the rendered HTML and adds event listeners and other interactivity to it to make the client interactive. Hydration is a whole topic in itself, so let’s just jump to how Next.js handles hydration for its components. The Next.js Framework Next.js gives developers the best of both worlds - fully rendered HTML served to the browser, with the ability to selectively hydrate interactive components.]]></summary></entry><entry><title type="html">Configuring HTTPS on Linux for Production</title><link href="/dev-blog/2024/10/01/configuring-https-on-ubuntu.html" rel="alternate" type="text/html" title="Configuring HTTPS on Linux for Production" /><published>2024-10-01T14:15:01+00:00</published><updated>2024-10-01T14:15:01+00:00</updated><id>/dev-blog/2024/10/01/configuring-https-on-ubuntu</id><content type="html" xml:base="/dev-blog/2024/10/01/configuring-https-on-ubuntu.html"><![CDATA[<p><em>This is Part 2 of <a href="/dev-blog/2024/09/30/securing-ubuntu-server.html">Securing a Linux Server for Production</a>.</em></p>

<p>In the last post, we looked at how to secure a Linux server for production by taking some common-sense measures against 
common vulnerabilities. In this post, I’m going to move forward with setting up HTTPS so that the client communication 
with the server is encrypted. Additionally, I’m going to set up a reverse-proxy for my server so that all requests can 
come in through a single entrypoint and get routed to the correct Docker container. As we’ll soon see, this actually 
solves the problem with Docker overwriting <code class="language-plaintext highlighter-rouge">ufw</code>’s iptable routing rules. For both of these things, I’ll be using a cool 
tool called Traefik.</p>

<!-- excerpt-start -->
<p>Traefik is a HTTP reverse-proxy and load balancer written in Go. Let’s go ahead and use it to configure HTTPS, 
auto-renew SSL Certificates, and proxy incoming requests to our containers, avoiding exporting Docker ports. 
<!-- excerpt-end --></p>

<p>There’s a weird little quirk when it comes to using Docker with <code class="language-plaintext highlighter-rouge">ufw</code>, and that is that using a Docker <code class="language-plaintext highlighter-rouge">EXPOSE &lt;port&gt;</code>
directive, or any port mappings in a docker-compose file will actually override the <code class="language-plaintext highlighter-rouge">ufw</code> firewall rules. There are many 
ways to get around this, but I’ll go with configuring Traefik as a reverse proxy. This way I don’t actually need to expose 
any Docker ports. This will have the added benefit of helping me down the road with HTTPS Certificate renewals via a 
concept called TLS Termination Proxying - woohoo!</p>

<h2 id="configuring-traefik-as-a-reverse-proxy">Configuring Traefik As A Reverse Proxy</h2>
<p>Since exposing Docker ports overrides <code class="language-plaintext highlighter-rouge">ufw</code>’s configs, we can use Traefik to solve this. The goal would be to have just 
the Traefik service’s port exposed on port 80, which would proxy all incoming traffic to the correct services, without 
having those services export ports themselves. Traefik handles this by having dynamic service discover through hooking 
into what it calls “providers”, or anything that has service definitions. This could be things like YAML files with 
static service definitions, or dynamic service registries like Docker, Kubernetes, Etcd, or Zookeeper. Traefik has ways 
of hooking into each service definition, which makes its auto discovery feature really powerful.</p>

<p>In this case, we’re using Docker, so we’ll be using the <code class="language-plaintext highlighter-rouge">docker</code> provider. Let’s start with a basic <code class="language-plaintext highlighter-rouge">docker-compose.yml</code> 
file to illustrate everything. Since my super secret FastAPI endpoints are very secret, I’ll be using a dummy service 
image to illustrate this. I’ll call the image <code class="language-plaintext highlighter-rouge">myservice:latest</code>, to be generic. Let’s look at an example:</p>

<div class="language-yaml highlighter-rouge"><div class="highlight"><pre class="highlight"><code><span class="na">services</span><span class="pi">:</span>
  <span class="na">example_service</span><span class="pi">:</span>
    <span class="na">image</span><span class="pi">:</span> <span class="s">myservice:latest</span>
    <span class="na">command</span><span class="pi">:</span> <span class="pi">[</span><span class="s2">"</span><span class="s">start"</span><span class="pi">,</span> <span class="s2">"</span><span class="s">--port"</span><span class="pi">,</span> <span class="s2">"</span><span class="s">8000"</span><span class="pi">]</span>
    <span class="na">env_file</span><span class="pi">:</span>
      <span class="s">.env.sample</span>
</code></pre></div></div>

<p>This will be the base configuration we’ll start with. Just a single service called <code class="language-plaintext highlighter-rouge">example_service</code> running an instance 
of <code class="language-plaintext highlighter-rouge">myservice:latest</code>, run with the “start” command on port 8000, and injected with environment variables from a file called 
<code class="language-plaintext highlighter-rouge">.env.sample</code>. Piece of cake. But it’s missing port mappings, and this is intentional - we <em>don’t</em> want to expose ports, 
since this will expose port 8000 to incoming traffic, but we only want people using our app on port 80. Notice how the 
start command didn’t actually expose any ports, but rather just ran the program on the port. Now, let’s set up Traefik 
to proxy requests to <code class="language-plaintext highlighter-rouge">myservice</code>:</p>

<div class="language-yaml highlighter-rouge"><div class="highlight"><pre class="highlight"><code><span class="na">services</span><span class="pi">:</span>
  <span class="na">example_service</span><span class="pi">:</span>
    <span class="na">image</span><span class="pi">:</span> <span class="s">myservice:latest</span>
    <span class="na">command</span><span class="pi">:</span> <span class="pi">[</span><span class="s2">"</span><span class="s">start"</span><span class="pi">,</span> <span class="s2">"</span><span class="s">--port"</span><span class="pi">,</span> <span class="s2">"</span><span class="s">8000"</span><span class="pi">]</span>
    <span class="na">env_file</span><span class="pi">:</span>
      <span class="s">.env.sample</span>
    <span class="na">labels</span><span class="pi">:</span>
      <span class="pi">-</span> <span class="s2">"</span><span class="s">traefik.enable=true"</span>
      <span class="pi">-</span> <span class="s2">"</span><span class="s">traefik.http.services.example_service.loadbalancer.server.port=8000"</span>
      <span class="pi">-</span> <span class="s2">"</span><span class="s">traefik.http.routers.example_service.rule=Host(`test.domain.local`)"</span>

  <span class="na">traefik</span><span class="pi">:</span>
    <span class="na">image</span><span class="pi">:</span> <span class="s">traefik:v3.1</span>
    <span class="na">command</span><span class="pi">:</span>
      <span class="pi">-</span> <span class="s2">"</span><span class="s">--api.insecure=true"</span>
      <span class="pi">-</span> <span class="s2">"</span><span class="s">--providers.docker"</span>
    <span class="na">ports</span><span class="pi">:</span>
      <span class="pi">-</span> <span class="s2">"</span><span class="s">80:80"</span>
      <span class="pi">-</span> <span class="s2">"</span><span class="s">8080:8080"</span>
    <span class="na">volumes</span><span class="pi">:</span>
      <span class="pi">-</span> <span class="s">/var/run/docker.sock:/var/run/docker.sock</span>
</code></pre></div></div>

<p>Ok, that looks like a good start! Let’s break this down:</p>

<p>On the <code class="language-plaintext highlighter-rouge">example_service</code>, we added a few labels:</p>
<ul>
  <li><code class="language-plaintext highlighter-rouge">"traefik.enable=true"</code> - enables Traefik proxying to this service</li>
  <li><code class="language-plaintext highlighter-rouge">"traefik.http.services.example_service.loadbalancer.server.port=8000"</code> - marks this service’s port as 8000</li>
  <li><code class="language-plaintext highlighter-rouge">"traefik.http.routers.example_service.rule=Host(`test.domain.localhost`)"</code> - sets a rule to redirect requests to the host (in this case, <code class="language-plaintext highlighter-rouge">test.domain.localhost</code>) to this service</li>
</ul>

<p>And we added a new service called <code class="language-plaintext highlighter-rouge">traefik</code>, with the following commands:</p>
<ul>
  <li><code class="language-plaintext highlighter-rouge">"--api.insecure=true"</code> - allows access the Web UI</li>
  <li><code class="language-plaintext highlighter-rouge">"--providers.docker"</code> - this signifies that we’re using the Docker provider</li>
</ul>

<p>Now that we have this config set, let’s see that commands are proxied correctly. We’ll run <code class="language-plaintext highlighter-rouge">docker compose up</code> and then 
try to hit our API. Hitting <code class="language-plaintext highlighter-rouge">test.domain.localhost</code> should show us the response!</p>

<p>One thing to be VERY mindful of is this:</p>
<div class="language-yaml highlighter-rouge"><div class="highlight"><pre class="highlight"><code><span class="nn">...</span>
<span class="na">volumes</span><span class="pi">:</span>
      <span class="pi">-</span> <span class="s">/var/run/docker.sock:/var/run/docker.sock</span>
</code></pre></div></div>

<p>In order for Traefik to autodiscover Docker services and route requests to them, it needs to hook into the Docker API. 
Traefik requires access to the Docker socket to get its dynamic configuration, and we’ve enabled this by mounting the 
Docker socket as a volume into the Traefik container. But this is in fact a security risk. There’s a ton of articles 
yelling at their readers to avoid this at all costs, because it can give attackers root access to not just the 
container, but the host machine! That’s… bad. Let’s fix it.</p>

<p>We’ll go ahead and add a new service, called <code class="language-plaintext highlighter-rouge">docker-proxy</code>. Any Traefik requests to the Docker socket will be proxied 
through this service, which can filter out POST or other dangerous requests, and just limit it to GET-style requests.</p>

<div class="language-yaml highlighter-rouge"><div class="highlight"><pre class="highlight"><code><span class="na">services</span><span class="pi">:</span>

  <span class="na">example_service</span><span class="pi">:</span>
    <span class="na">image</span><span class="pi">:</span> <span class="s">myservice:latest</span>
    <span class="na">command</span><span class="pi">:</span> <span class="pi">[</span><span class="s2">"</span><span class="s">start"</span><span class="pi">,</span> <span class="s2">"</span><span class="s">--port"</span><span class="pi">,</span> <span class="s2">"</span><span class="s">8000"</span><span class="pi">]</span>
    <span class="na">env_file</span><span class="pi">:</span>
      <span class="s">.env.sample</span>
    <span class="na">labels</span><span class="pi">:</span>
      <span class="pi">-</span> <span class="s2">"</span><span class="s">traefik.enable=true"</span>
      <span class="pi">-</span> <span class="s2">"</span><span class="s">traefik.http.services.example_service.loadbalancer.server.port=8000"</span>
      <span class="pi">-</span> <span class="s2">"</span><span class="s">traefik.http.routers.example_service.rule=Host(`test.domain.local`)"</span>
    <span class="na">networks</span><span class="pi">:</span>
      <span class="pi">-</span> <span class="s">traefik-servicenet</span>

  <span class="na">docker-proxy</span><span class="pi">:</span>
    <span class="na">image</span><span class="pi">:</span> <span class="s">tecnativa/docker-socket-proxy:edge</span>
    <span class="na">networks</span><span class="pi">:</span>
      <span class="pi">-</span> <span class="s">docker-proxynet</span>
    <span class="na">volumes</span><span class="pi">:</span>
      <span class="pi">-</span> <span class="s">/var/run/docker.sock:/var/run/docker.sock:ro</span>
    <span class="na">environment</span><span class="pi">:</span>
      <span class="na">LOG_LEVEL</span><span class="pi">:</span> <span class="s">DEBUG</span>
      <span class="na">CONTAINERS</span><span class="pi">:</span> <span class="m">1</span>
      <span class="na">SERVICES</span><span class="pi">:</span> <span class="m">1</span>
      <span class="na">NODES</span><span class="pi">:</span> <span class="m">1</span>
      <span class="na">NETWORKS</span><span class="pi">:</span> <span class="m">1</span>
      <span class="na">TASKS</span><span class="pi">:</span> <span class="m">1</span>
      <span class="na">VERSION</span><span class="pi">:</span> <span class="m">1</span>

  <span class="na">traefik</span><span class="pi">:</span>
    <span class="na">image</span><span class="pi">:</span> <span class="s">traefik:v3.1</span>
    <span class="na">command</span><span class="pi">:</span>
      <span class="pi">-</span> <span class="s2">"</span><span class="s">--api.insecure=true"</span>
      <span class="pi">-</span> <span class="s2">"</span><span class="s">--providers.docker"</span>
      <span class="pi">-</span> <span class="s2">"</span><span class="s">--providers.docker.exposedByDefault=false"</span>
      <span class="pi">-</span> <span class="s2">"</span><span class="s">--providers.docker.endpoint=tcp://docker-proxy:2375"</span>
      <span class="pi">-</span> <span class="s2">"</span><span class="s">--providers.docker.network=docker-proxynet"</span>
    <span class="na">depends_on</span><span class="pi">:</span>
      <span class="pi">-</span> <span class="s">docker-proxy</span>
    <span class="na">read_only</span><span class="pi">:</span> <span class="no">true</span>
    <span class="na">ports</span><span class="pi">:</span>
      <span class="pi">-</span> <span class="s2">"</span><span class="s">80:80"</span>
      <span class="pi">-</span> <span class="s2">"</span><span class="s">8080:8080"</span>
    <span class="na">networks</span><span class="pi">:</span>
      <span class="pi">-</span> <span class="s">traefik-servicenet</span>
      <span class="pi">-</span> <span class="s">docker-proxynet</span>

<span class="na">networks</span><span class="pi">:</span>
  <span class="na">traefik-servicenet</span><span class="pi">:</span>
    <span class="na">name</span><span class="pi">:</span> <span class="s">traefik-servicenet</span>
  <span class="na">docker-proxynet</span><span class="pi">:</span>
    <span class="na">internal</span><span class="pi">:</span> <span class="no">true</span>
    <span class="na">name</span><span class="pi">:</span> <span class="s">docker-proxynet</span>
</code></pre></div></div>

<p>The image <code class="language-plaintext highlighter-rouge">tecnativa/docker-socket-proxy:edge</code> is built on top of HAProxy, which is proxying requests to the socket over 
tcp. We’re still mounting the <code class="language-plaintext highlighter-rouge">/var/run/docker.sock</code>, but in this case, it’s safer because the <code class="language-plaintext highlighter-rouge">docker-proxynet</code> network 
is internal, meaning the <code class="language-plaintext highlighter-rouge">docker-proxy</code> container won’t be exposed to the public internet, whereas the <code class="language-plaintext highlighter-rouge">traefik</code> 
container will be. Great! No more mounting sockets to public containers.</p>

<h2 id="configuring-traefik-for-https">Configuring Traefik For HTTPS</h2>
<p>Now that we have Traefik set up as a reverse-proxy, and we also set up a docker-proxy to safeguard the Docker socket, 
it’s time to talk about HTTPS. HTTPS is a protocol built on top of TCP. It works by encrypting the data of the 
connection over TCP, allowing only the client to decrypt this data, and this is achieved through certificates. 
Certificates are granted through a Certificate Authority (CA) which assert the authority of the certificate holder. 
There is a chain-of-trust, such that when the client receives the certificate from the HTTPS server, it will validate 
the certificate by following its issuers’ certificates up the chain until the last link. If that link is valid, the 
whole chain is trustworthy, and the connection is good to proceed!</p>

<p>Traefik is nice, because it actually automatically renews its own certificates from Let’s Encrypt, saving us, the users, 
time from doing this all manually. It’s as simple as adding a few extra configs to Traefik and our service:</p>

<div class="language-yaml highlighter-rouge"><div class="highlight"><pre class="highlight"><code><span class="na">services</span><span class="pi">:</span> 
  <span class="na">example_service</span><span class="pi">:</span>
    <span class="na">image</span><span class="pi">:</span> <span class="s">myservice:latest</span>
    <span class="na">command</span><span class="pi">:</span> <span class="pi">[</span><span class="s2">"</span><span class="s">start"</span><span class="pi">,</span> <span class="s2">"</span><span class="s">--port"</span><span class="pi">,</span> <span class="s2">"</span><span class="s">8000"</span><span class="pi">]</span>
    <span class="na">env_file</span><span class="pi">:</span>
      <span class="s">.env.sample</span>
    <span class="na">labels</span><span class="pi">:</span>
      <span class="pi">-</span> <span class="s2">"</span><span class="s">traefik.enable=true"</span>
      <span class="pi">-</span> <span class="s2">"</span><span class="s">traefik.http.services.example_service.loadbalancer.server.port=8000"</span>
      <span class="pi">-</span> <span class="s2">"</span><span class="s">traefik.http.routers.example_service.rule=Host(`test.domain.local`)"</span>
      <span class="pi">-</span> <span class="s2">"</span><span class="s">traefik.http.routers.backend.entrypoints=websecure"</span>
      <span class="pi">-</span> <span class="s2">"</span><span class="s">traefik.http.routers.backend.tls.certresolver=myresolver"</span>
      <span class="pi">-</span> <span class="s2">"</span><span class="s">traefik.enable=true"</span>
    <span class="na">networks</span><span class="pi">:</span>
      <span class="pi">-</span> <span class="s">traefik-servicenet</span>
        
  <span class="na">docker-proxy</span><span class="pi">:</span>
    <span class="na">image</span><span class="pi">:</span> <span class="s">tecnativa/docker-socket-proxy:edge</span>
    <span class="na">networks</span><span class="pi">:</span>
      <span class="pi">-</span> <span class="s">docker-proxynet</span>
    <span class="na">volumes</span><span class="pi">:</span>
      <span class="pi">-</span> <span class="s">/var/run/docker.sock:/var/run/docker.sock:ro</span>
    <span class="na">environment</span><span class="pi">:</span>
      <span class="na">LOG_LEVEL</span><span class="pi">:</span> <span class="s">DEBUG</span>
      <span class="na">CONTAINERS</span><span class="pi">:</span> <span class="m">1</span>
      <span class="na">SERVICES</span><span class="pi">:</span> <span class="m">1</span>
      <span class="na">NODES</span><span class="pi">:</span> <span class="m">1</span>
      <span class="na">NETWORKS</span><span class="pi">:</span> <span class="m">1</span>
      <span class="na">TASKS</span><span class="pi">:</span> <span class="m">1</span>
      <span class="na">VERSION</span><span class="pi">:</span> <span class="m">1</span>

  <span class="na">traefik</span><span class="pi">:</span>
    <span class="na">image</span><span class="pi">:</span> <span class="s">traefik:v3.1</span>
    <span class="na">command</span><span class="pi">:</span>
      <span class="pi">-</span> <span class="s2">"</span><span class="s">--api.insecure=true"</span>
      <span class="pi">-</span> <span class="s2">"</span><span class="s">--providers.docker"</span>
      <span class="pi">-</span> <span class="s2">"</span><span class="s">--providers.docker.exposedByDefault=false"</span>
      <span class="pi">-</span> <span class="s2">"</span><span class="s">--providers.docker.endpoint=tcp://docker-proxy:2375"</span>
      <span class="pi">-</span> <span class="s2">"</span><span class="s">--providers.docker.network=docker-proxynet"</span>
      <span class="pi">-</span> <span class="s2">"</span><span class="s">--entryPoints.web.address=:80"</span>
      <span class="pi">-</span> <span class="s2">"</span><span class="s">--entryPoints.websecure.address=:443"</span>
      <span class="pi">-</span> <span class="s2">"</span><span class="s">--entryPoints.web.http.redirections.entrypoint.to=websecure"</span>
      <span class="pi">-</span> <span class="s2">"</span><span class="s">--entryPoints.web.http.redirections.entrypoint.scheme=https"</span>
      <span class="pi">-</span> <span class="s2">"</span><span class="s">--certificatesresolvers.myresolver.acme.tlschallenge=true"</span>
      <span class="pi">-</span> <span class="s2">"</span><span class="s">--certificatesresolvers.myresolver.acme.email=ytimen@yuvaltimen.xyz"</span>
      <span class="pi">-</span> <span class="s2">"</span><span class="s">--certificatesresolvers.myresolver.acme.storage=/letsencrypt/acme.json"</span>
    <span class="na">depends_on</span><span class="pi">:</span>
      <span class="pi">-</span> <span class="s">docker-proxy</span>
    <span class="na">read_only</span><span class="pi">:</span> <span class="no">true</span>
    <span class="na">ports</span><span class="pi">:</span>
      <span class="pi">-</span> <span class="s2">"</span><span class="s">80:80"</span>
      <span class="pi">-</span> <span class="s2">"</span><span class="s">443:443"</span>
      <span class="pi">-</span> <span class="s2">"</span><span class="s">8080:8080"</span>
    <span class="na">volumes</span><span class="pi">:</span>
      <span class="pi">-</span> <span class="s">letsencrypt:/letsencrypt</span>
    <span class="na">networks</span><span class="pi">:</span>
      <span class="pi">-</span> <span class="s">traefik-servicenet</span>
      <span class="pi">-</span> <span class="s">docker-proxynet</span>

<span class="na">volumes</span><span class="pi">:</span>
  <span class="na">letsencrypt</span><span class="pi">:</span>

<span class="na">networks</span><span class="pi">:</span>
  <span class="na">traefik-servicenet</span><span class="pi">:</span>
    <span class="na">name</span><span class="pi">:</span> <span class="s">traefik-servicenet</span>
  <span class="na">docker-proxynet</span><span class="pi">:</span>
    <span class="na">name</span><span class="pi">:</span> <span class="s">docker-proxynet</span>
    <span class="na">internal</span><span class="pi">:</span> <span class="no">true</span>
</code></pre></div></div>

<p>With that, our configs should be done! We want to just verify that everything works by checking the following few items:</p>
<ul>
  <li>Requests to https://test.domain.local work</li>
  <li>Requests to test.domain.local (without specifying protocol, will default to http) redirect to https</li>
  <li>The dashboard is still active at test.domain.local:8080</li>
</ul>

<p>And there we have it! A fully functioning HTTPS service, behind a reverse-proxy, accessing the Docker API securely, on 
a remote host. I think we’ve earned a large piece of tiramisu, don’t you think?</p>

<h2 id="references">References</h2>
<ul>
  <li>Traefik’s <a href="https://doc.traefik.io/traefik/">documentation</a></li>
  <li>Dreams of Code’s <a href="https://www.youtube.com/watch?v=F-9KWQByeU0&amp;t=376s">YouTube video</a> on setting up a production-ready VPS</li>
  <li>Wollomatic’s <a href="https://github.com/wollomatic/traefik-hardened/tree/master">repo</a> describing securely accessing Docker sockets</li>
  <li>Chris Wiegman’s <a href="https://chriswiegman.com/2019/10/serving-your-docker-apps-with-https-and-traefik-2/">blog post</a> describing setting up Traefik and Docker with HTTPS</li>
</ul>]]></content><author><name>Yuval Timen</name></author><category term="tech" /><summary type="html"><![CDATA[This is Part 2 of Securing a Linux Server for Production. In the last post, we looked at how to secure a Linux server for production by taking some common-sense measures against common vulnerabilities. In this post, I’m going to move forward with setting up HTTPS so that the client communication with the server is encrypted. Additionally, I’m going to set up a reverse-proxy for my server so that all requests can come in through a single entrypoint and get routed to the correct Docker container. As we’ll soon see, this actually solves the problem with Docker overwriting ufw’s iptable routing rules. For both of these things, I’ll be using a cool tool called Traefik. Traefik is a HTTP reverse-proxy and load balancer written in Go. Let’s go ahead and use it to configure HTTPS, auto-renew SSL Certificates, and proxy incoming requests to our containers, avoiding exporting Docker ports.]]></summary></entry><entry><title type="html">Securing a Linux Server for Production</title><link href="/dev-blog/2024/09/30/securing-ubuntu-server.html" rel="alternate" type="text/html" title="Securing a Linux Server for Production" /><published>2024-09-30T17:34:01+00:00</published><updated>2024-09-30T17:34:01+00:00</updated><id>/dev-blog/2024/09/30/securing-ubuntu-server</id><content type="html" xml:base="/dev-blog/2024/09/30/securing-ubuntu-server.html"><![CDATA[<!-- excerpt-start -->
<p>Let’s be honest. Platform as a Service (PaaS) providers overcharge for a lot of their services. 
It makes sense - they need to make money <em>somehow</em>. But not on my dime! I’m going to set up my own 
Virtual Private Server (VPS) for self-hosting, and I’m gonna do it on the cheap. 
<!-- excerpt-end --></p>

<h2 id="provisioning-the-server">Provisioning The Server</h2>
<p>The first step is to provision the actual server. Normally, I’d use Terraform or the like, but for simplicity, 
I’m going to use Linode’s UI to get this up and running. In the future, I may write an actual <code class="language-plaintext highlighter-rouge">.tf</code> file, but this 
blog post is about getting to production. Securely, of course.</p>

<p>I created a “Nanode” instance with 1 GB RAM, 1 CPU Core, and 25 GB of storage. This is a tiny server, so I may have to re-do 
this process in the future using a bigger image. But for now, I’ll take it.</p>

<h2 id="first-things-first">First Things First</h2>
<p>First things first: update the server! This should be done on a regular basis. Since we’re on an Ubuntu distribution, 
we’ll run:</p>

<div class="language-bash highlighter-rouge"><div class="highlight"><pre class="highlight"><code><span class="o">&gt;&gt;</span> apt update <span class="o">&amp;&amp;</span> apt upgrade
</code></pre></div></div>

<p>After this runs, the system may recommend to reboot or restart certain services, so go ahead and follow the prompts 
or read through the suggestions and do what you feel is best.</p>

<p>Next, since I’m in the EST timezone, I’ll set the timezone, since it uses UTC by default:</p>

<div class="language-bash highlighter-rouge"><div class="highlight"><pre class="highlight"><code><span class="o">&gt;&gt;</span> timedatectl set-timezone <span class="s1">'America/New_York'</span>
<span class="c"># Check the time to make sure it aligns with your local timezone</span>
<span class="o">&gt;&gt;</span> <span class="nb">date</span>
</code></pre></div></div>

<p>We’ll go ahead and set the hostname for our machine:</p>
<div class="language-bash highlighter-rouge"><div class="highlight"><pre class="highlight"><code><span class="o">&gt;&gt;</span> hostnamectl set-hostname production
</code></pre></div></div>

<p>Now, after logging out and then ssh’ing back as root, we should see the prompt like this:
<code class="language-plaintext highlighter-rouge">root@production:~#</code>, instead of <code class="language-plaintext highlighter-rouge">root@localhost:~#</code>.</p>

<h2 id="setting-up-a-domain-name">Setting Up A Domain Name</h2>
<p>I bought a domain name from <a href="https://www.namecheap.com/">Namecheap.com</a>.
Once I confirmed my information from their email, I was able to manage the DNS settings for the domain.
I used Namecheap’s BasicDNS since it was the cheapest and most basic option, and then proceeded to their
Advanced DNS tab to configure the settings.</p>

<p>Under “Host Records”, I added a new <code class="language-plaintext highlighter-rouge">A Record</code> with the “Host” set to <code class="language-plaintext highlighter-rouge">@</code> (denoting that no prefix should be used),
and I set the “Value” of the record to be equal to the Public IP Address of my VPS. I left the TTL on “Automatic”,
which typically defaults to 300 seconds (5 min). This TTL value dictates how long the DNS record will be cached
in the DNS servers for, meaning that if I add or change a DNS record, it may take up to 5 minutes to go into effect.</p>

<p>I can test that this change took effect by seeing if my new hostname is resolved. In this case, the domain name that I
bought was <code class="language-plaintext highlighter-rouge">yuvaltimen.xyz</code>. Let’s see if it got updated to point to my VPS’s IP Address:</p>

<div class="language-bash highlighter-rouge"><div class="highlight"><pre class="highlight"><code><span class="o">&gt;&gt;</span> ping yuvaltimen.xyz 

PING yuvaltimen.xyz <span class="o">(</span>45.33.90.24<span class="o">)</span>: 56 data bytes
64 bytes from 45.33.90.24: <span class="nv">icmp_seq</span><span class="o">=</span>0 <span class="nv">ttl</span><span class="o">=</span>53 <span class="nb">time</span><span class="o">=</span>14.245 ms
64 bytes from 45.33.90.24: <span class="nv">icmp_seq</span><span class="o">=</span>1 <span class="nv">ttl</span><span class="o">=</span>53 <span class="nb">time</span><span class="o">=</span>21.427 ms
...
</code></pre></div></div>

<p>It worked! I can see my VPS’s IP Address <code class="language-plaintext highlighter-rouge">45.33.90.24</code> returned from the <code class="language-plaintext highlighter-rouge">ping</code>, meaning that the Domain Name
<code class="language-plaintext highlighter-rouge">yuvaltimen.xyz</code> was resolved to the IP Address <code class="language-plaintext highlighter-rouge">45.33.90.24</code>.</p>

<p>We’ll need to do the same thing for the IPv6 address, except using an AAAA record instead of an A record.</p>

<h2 id="updating-the-systems-hosts-file">Updating The System’s <code class="language-plaintext highlighter-rouge">hosts</code> File</h2>

<p>The <code class="language-plaintext highlighter-rouge">hosts</code> file is used for host resolution, and is referenced before using DNS. This file contains a list of static 
associations between IP addresses and hostnames/domains which the system prioritizes before DNS.</p>

<p>Edit the <code class="language-plaintext highlighter-rouge">/etc/hosts</code> file:</p>
<div class="language-plaintext highlighter-rouge"><div class="highlight"><pre class="highlight"><code>127.0.0.1 localhost
45.33.90.24 yuvaltimen.xyz production
2600:3c03::f03c:95ff:fe43:779a yuvaltimen.xyz production
</code></pre></div></div>

<h2 id="setting-up-users">Setting Up Users</h2>
<p>After waiting a while for the server to be provisioned, I can see that my new server’s public IP address is <code class="language-plaintext highlighter-rouge">45.33.90.24</code>. 
I’m going to go ahead and SSH into it as the root user:</p>

<div class="language-bash highlighter-rouge"><div class="highlight"><pre class="highlight"><code><span class="o">&gt;&gt;</span> ssh root@45.33.90.24
</code></pre></div></div>

<p>Part of the setup process on Linode was setting a password and SSH public key for this user, so 
SSH’ing into this server for the first time, I’ll go ahead and enter that password and confirm the 
fingerprint for the server. Now, upon future logins, it should use my SSH key to avoid re-entering the password.</p>

<p>I’ll go ahead and create a non-root user:</p>

<div class="language-bash highlighter-rouge"><div class="highlight"><pre class="highlight"><code><span class="o">&gt;&gt;</span> adduser ytimen
</code></pre></div></div>

<p>and follow the prompts for setting this new user’s password and details. Next, I’ll want to grant this user <code class="language-plaintext highlighter-rouge">sudo</code> 
permissions:</p>

<div class="language-bash highlighter-rouge"><div class="highlight"><pre class="highlight"><code><span class="o">&gt;&gt;</span> usermod <span class="nt">-aG</span> <span class="nb">sudo </span>ytimen
</code></pre></div></div>

<p>To test that the new user has the correct permissions, we can try to run a <code class="language-plaintext highlighter-rouge">sudo</code> command with the new user. 
We have 2 options for doing this:</p>

<ol>
  <li>Use the <code class="language-plaintext highlighter-rouge">su</code> command:
    <div class="language-bash highlighter-rouge"><div class="highlight"><pre class="highlight"><code><span class="c"># substitute user with the new user</span>
<span class="o">&gt;&gt;</span> su ytimen
<span class="c"># list the contents of the root directory, will prompt for a password</span>
<span class="o">&gt;&gt;</span> <span class="nb">sudo ls</span> /
</code></pre></div>    </div>
  </li>
  <li>Exit from <code class="language-plaintext highlighter-rouge">root</code> and log back in with new user
    <div class="language-bash highlighter-rouge"><div class="highlight"><pre class="highlight"><code><span class="c"># Leave</span>
<span class="o">&gt;&gt;</span> <span class="nb">exit</span>
<span class="c"># Return</span>
<span class="o">&gt;&gt;</span> ssh ytimen@45.33.90.24
<span class="o">&gt;&gt;</span> <span class="nb">sudo ls</span> /
</code></pre></div>    </div>
  </li>
</ol>

<p>It’s been confirmed - the new user is all set!</p>

<h2 id="hardening-the-server">Hardening The Server</h2>
<p>Now that I have the server running with a Domain Name and a non-root user, I can go ahead configuring security 
measures to harden the server. There are countless measures that can be taken, and ultimately, anything connected to the 
internet (and even machines air-gapped from the internet) have vulnerabilities. But the goal is not to hermetically seal 
the server. The goal is to take common-sense measures to harden it against hackers’ automated scripts. Since my server will 
<em>probably</em> not contain national secrets or other ultra-sensitive information, my threat landscape will be pretty contained 
and I can focus on basic security measures. That being said, if your server contains high-value information, you may need to 
go to greater lengths to secure access to your machine.</p>

<h3 id="1-getting-rid-of-password-based-logins">1. Getting Rid Of Password-Based Logins</h3>
<p>Passwords are less secure than SSH keys, because they can be brute-forced. Or worse, you might be one of those 
knuckleheads that uses a password like “password”, which most hackers will try to guess first before even trying to 
brute-force anything else. Meanwhile, SSH keys are much harder to crack, and while they do have their weaknesses, they 
are considered more secure than password-based logins.</p>

<p>Let’s quickly give the server a place to store SSH information. Create a directory on the server:</p>
<div class="language-bash highlighter-rouge"><div class="highlight"><pre class="highlight"><code><span class="o">&gt;&gt;</span> <span class="nb">mkdir</span> <span class="nt">-p</span> ~/.ssh <span class="o">&amp;&amp;</span> <span class="nb">sudo chmod</span> <span class="nt">-R</span> 700 ~/.ssh/
</code></pre></div></div>

<p>Now I’ll switch to a terminal on my local computer. Since I already have SSH keys on my computer, 
I’ll be using one of those. If you don’t have keys, or if future me decides I need to access this 
server from a different machine, I’d have to generate a new key-pair and copy the public 
key to the server. This can be done through the <code class="language-plaintext highlighter-rouge">ssh-keygen</code> command, for example:</p>

<div class="language-bash highlighter-rouge"><div class="highlight"><pre class="highlight"><code><span class="o">&gt;&gt;</span>  ssh-keygen <span class="nt">-t</span> ed25519 <span class="nt">-a</span> 32 <span class="nt">-f</span> ~/.ssh/id_ed25519 <span class="nt">-R</span> 45.33.90.24
</code></pre></div></div>

<p>This would create a key-pair, one private and one public key. The private key created at <code class="language-plaintext highlighter-rouge">~/.ssh/id_ed25519</code> is the 
private you secret that you should NEVER SHARE WITH ANYONE OR COPY ANYWHERE, and the public key at 
<code class="language-plaintext highlighter-rouge">~/.ssh/id_ed25519.pub</code> is to be copied to the server using the following command:</p>

<div class="language-bash highlighter-rouge"><div class="highlight"><pre class="highlight"><code><span class="o">&gt;&gt;</span> ssh-copy-id <span class="nt">-i</span> ~/.ssh/id_ed25519 ytimen@yuvaltimen.xyz
</code></pre></div></div>

<p>This will SSH into the remote machine at <code class="language-plaintext highlighter-rouge">yuvaltimen.xyz</code> using the user <code class="language-plaintext highlighter-rouge">ytimen</code> and add the public key corresponding 
to <code class="language-plaintext highlighter-rouge">~/.ssh/id_ed25519</code> (in this case, <code class="language-plaintext highlighter-rouge">~/.ssh/authorized_keys.pub</code>) to the remote user’s <code class="language-plaintext highlighter-rouge">~/.ssh/authorized_keys</code>.</p>

<p>And to add a tiny bit of extra security, we can lock down the <code class="language-plaintext highlighter-rouge">~/.ssh/authorized_keys</code> file itself:</p>

<div class="language-bash highlighter-rouge"><div class="highlight"><pre class="highlight"><code><span class="o">&gt;&gt;</span> <span class="nb">sudo chmod</span> <span class="nt">-R</span> 700 ~/.ssh <span class="o">&amp;&amp;</span> <span class="nb">chmod </span>600 ~/.ssh/authorized_keys
</code></pre></div></div>

<p>Now that I’ve added my public key, let’s go ahead and disable password-based auth and non-root logins. I’ll open up my 
sshd_config file:</p>

<div class="language-bash highlighter-rouge"><div class="highlight"><pre class="highlight"><code><span class="o">&gt;&gt;</span> <span class="nb">sudo </span>vim /etc/ssh/sshd_config
</code></pre></div></div>

<p>and set the following options, making sure to save the file after editing:</p>

<div class="language-plaintext highlighter-rouge"><div class="highlight"><pre class="highlight"><code>PasswordAuthentication no
PermitRootLogin no
UsePAM no
</code></pre></div></div>

<p>Now, I’ll apply these changes by restarting the ssh service:</p>

<div class="language-bash highlighter-rouge"><div class="highlight"><pre class="highlight"><code><span class="o">&gt;&gt;</span> <span class="nb">sudo </span>systemctl reload ssh 
</code></pre></div></div>

<p>I can confirm that this works by attempting to ssh in as the root user:</p>

<div class="language-bash highlighter-rouge"><div class="highlight"><pre class="highlight"><code><span class="o">&gt;&gt;</span> ssh root@yuvaltimen.xyz

root@45.33.90.24: Permission denied <span class="o">(</span>publickey<span class="o">)</span><span class="nb">.</span> 
</code></pre></div></div>

<p>Nice! Permission denied, just like we hoped for.</p>

<h3 id="2-removing-unnecessary-software">2. Removing Unnecessary Software</h3>
<p>There are many packages that come pre-installed with Ubuntu, and many of them I will never need on this machine.
I’ll go ahead and remove as many of these as I can to reduce the attack surface of my server.</p>

<p>I can see which services are in use by running <code class="language-plaintext highlighter-rouge">sudo ss -atpu</code>. We’ll go ahead and delete any packages we don’t want 
with the following command:</p>
<div class="language-bash highlighter-rouge"><div class="highlight"><pre class="highlight"><code><span class="o">&gt;&gt;</span>  <span class="nb">sudo </span>apt-get purge <span class="nt">--auto-remove</span> &lt;packages&gt; 
</code></pre></div></div>

<p>where <code class="language-plaintext highlighter-rouge">&lt;packages&gt;</code> is a space-separated list of apt package names. The ones I removed were:</p>
<ul>
  <li><code class="language-plaintext highlighter-rouge">telnetd</code></li>
  <li><code class="language-plaintext highlighter-rouge">ftp</code></li>
  <li><code class="language-plaintext highlighter-rouge">vsftpd</code></li>
  <li><code class="language-plaintext highlighter-rouge">samba</code></li>
  <li><code class="language-plaintext highlighter-rouge">nfs-kernel-server</code></li>
  <li><code class="language-plaintext highlighter-rouge">nfs-common</code></li>
</ul>

<h3 id="3-setting-up-a-firewall">3. Setting Up A Firewall</h3>
<p>Controlling incoming and outgoing network requests is an essential part of securing the server. Luckily, Ubuntu has a 
really easy solution pre-installed. Enter, <code class="language-plaintext highlighter-rouge">ufw</code>: The <code class="language-plaintext highlighter-rouge">U</code>ncomplicated <code class="language-plaintext highlighter-rouge">F</code>ire<code class="language-plaintext highlighter-rouge">W</code>all. This is the configuration I used:</p>

<div class="language-bash highlighter-rouge"><div class="highlight"><pre class="highlight"><code><span class="c"># Disable all inbound network requests by default</span>
<span class="o">&gt;&gt;</span> <span class="nb">sudo </span>ufw default deny incoming

<span class="c"># Enable all outbound network requests by default</span>
<span class="o">&gt;&gt;</span> <span class="nb">sudo </span>ufw default allow outgoing

<span class="c"># Enable inbound requests to OpenSSH server, to allow SSH'ing into the VPS </span>
<span class="c"># Also enable inbound requests to the web server ports 80 and 8080</span>
<span class="o">&gt;&gt;</span> <span class="nb">sudo </span>ufw allow OpenSSH
<span class="o">&gt;&gt;</span> <span class="nb">sudo </span>ufw allow http
<span class="o">&gt;&gt;</span> <span class="nb">sudo </span>ufw allow https
<span class="o">&gt;&gt;</span> <span class="nb">sudo </span>ufw allow 8080

<span class="c"># Check all the firewall rules applied thus far</span>
<span class="o">&gt;&gt;</span> <span class="nb">sudo </span>ufw show added

<span class="c"># Enable the firewall - will prompt for confirmation (y|n)? </span>
<span class="o">&gt;&gt;</span> <span class="nb">sudo </span>ufw <span class="nb">enable</span>

<span class="c"># Check the status of the firewall</span>
<span class="o">&gt;&gt;</span> <span class="nb">sudo </span>ufw status
</code></pre></div></div>

<p>This is all nice and good, but when eventually using Docker, it’s important to note that there’s a problem with using 
Docker with <code class="language-plaintext highlighter-rouge">ufw</code>. Essentially, exposing Docker ports will actually override <code class="language-plaintext highlighter-rouge">ufw</code>’s configs, so we need to be careful 
not to run Docker files with exposed ports that differ from the allowed ports. We will address this issue in the next 
post.</p>

<h3 id="4-installing-fail2ban">4. Installing Fail2Ban</h3>

<p>Despite all the steps above to secure the server, some people will still try to break in and use our machine to mine crypto. 
I’ve had this happen a few times, and it’s very time-consuming to constantly monitor logs and ban IP addresses that
are clearly bad actors. So lets use software to do that for us! Fail2Ban is an app that monitors system logs for things that 
look like automated attacks, and bans their IP address by updating the iptable. We can set the ttl on the ban for their 
IP.</p>

<p>Let’s first install it, along with Sendmail so we can get updates on what Fail2Ban is doing for us:</p>
<div class="language-bash highlighter-rouge"><div class="highlight"><pre class="highlight"><code><span class="o">&gt;&gt;</span> <span class="nb">sudo </span>apt <span class="nb">install </span>fail2ban sendmail
<span class="c"># Enable SSH access on UFW</span>
<span class="o">&gt;&gt;</span> <span class="nb">sudo </span>ufw allow ssh
<span class="o">&gt;&gt;</span> <span class="nb">sudo </span>ufw <span class="nb">enable</span>
</code></pre></div></div>

<p>Next we’ll configure Fail2Ban. We’ll use the default <code class="language-plaintext highlighter-rouge">fail2ban.conf</code> file, and we can override these updates in a separate 
override file called <code class="language-plaintext highlighter-rouge">fail2ban.local</code>, which keeps things clean and organized. The same goes for <code class="language-plaintext highlighter-rouge">jail.conf</code> which is the 
configuration file for which services fail2ban acts on.</p>

<p>We’ll copy the default files to local file versions:</p>
<div class="language-bash highlighter-rouge"><div class="highlight"><pre class="highlight"><code><span class="o">&gt;&gt;</span> <span class="nb">cp</span> /etc/fail2ban/fail2ban.conf /etc/fail2ban/fail2ban.local
<span class="o">&gt;&gt;</span> <span class="nb">cp</span> /etc/fail2ban/jail.conf /etc/fail2ban/jail.local
</code></pre></div></div>

<p>From here we can edit either of these local files. All of the configurations and their defaults are explained 
and we can customize things like the bantim, findtime, the formula for banning, and more. Additionally, we can create 
“jails”, which are ban lists for each service fail2ban is monitoring for us. We can see that we have the sshd jail set up 
by default by running:</p>

<div class="language-bash highlighter-rouge"><div class="highlight"><pre class="highlight"><code><span class="o">&gt;&gt;</span> <span class="nb">sudo </span>fail2ban-client status

Status
|- Number of jail:	1
<span class="sb">`</span>- Jail list:	sshd
</code></pre></div></div>
<p>We can add additional jails by setting them up in the <code class="language-plaintext highlighter-rouge">/etc/fail2ban/jail.local</code> file. We’ll get to this in the next post.
After making any changes, we can reload the configurations for them to take effect by running 
<code class="language-plaintext highlighter-rouge">sudo fail2ban-client reload</code>. If we wait some time and then run <code class="language-plaintext highlighter-rouge">sudo fail2ban-client banned</code> we can see an overview of 
what IPs have been banned, and in which jails. Finally, to see the logs, we can check <code class="language-plaintext highlighter-rouge">/var/log/fail2ban.log</code>.</p>

<p>That’s it for securing the server! Next lets actually run some software.</p>

<h2 id="installing-docker">Installing Docker</h2>
<p>Since I’m using Ubuntu, I’ll follow the instructions on the 
<a href="https://docs.docker.com/engine/install/ubuntu/">official Docker Docs</a> for installing Docker on Ubuntu systems. 
(I’ve slightly modified these commands for my own purposes):</p>

<h3 id="1-set-up-dockers-apt-repository">1. Set up Docker’s <code class="language-plaintext highlighter-rouge">apt</code> repository.</h3>

<div class="language-bash highlighter-rouge"><div class="highlight"><pre class="highlight"><code><span class="c"># Add Docker's official GPG key:</span>
<span class="nb">sudo </span>apt-get update
<span class="nb">sudo </span>apt-get <span class="nb">install </span>ca-certificates curl
<span class="nb">sudo install</span> <span class="nt">-m</span> 0755 <span class="nt">-d</span> /etc/apt/keyrings
<span class="nb">sudo </span>curl <span class="nt">-fsSL</span> https://download.docker.com/linux/ubuntu/gpg <span class="nt">-o</span> /etc/apt/keyrings/docker.asc
<span class="nb">sudo chmod </span>a+r /etc/apt/keyrings/docker.asc

<span class="c"># Add the repository to Apt sources:</span>
<span class="nb">echo</span> <span class="se">\</span>
  <span class="s2">"deb [arch=</span><span class="si">$(</span>dpkg <span class="nt">--print-architecture</span><span class="si">)</span><span class="s2"> signed-by=/etc/apt/keyrings/docker.asc] https://download.docker.com/linux/ubuntu </span><span class="se">\</span><span class="s2">
  </span><span class="si">$(</span><span class="nb">.</span> /etc/os-release <span class="o">&amp;&amp;</span> <span class="nb">echo</span> <span class="s2">"</span><span class="nv">$VERSION_CODENAME</span><span class="s2">"</span><span class="si">)</span><span class="s2"> stable"</span> | <span class="se">\</span>
  <span class="nb">sudo tee</span> /etc/apt/sources.list.d/docker.list <span class="o">&gt;</span> /dev/null
<span class="nb">sudo </span>apt-get update
</code></pre></div></div>

<h3 id="2-install-the-docker-packages">2. Install the Docker packages.</h3>

<div class="language-bash highlighter-rouge"><div class="highlight"><pre class="highlight"><code><span class="o">&gt;&gt;</span> <span class="nb">sudo </span>apt-get <span class="nb">install </span>docker-ce docker-ce-cli containerd.io docker-buildx-plugin docker-compose-plugin
</code></pre></div></div>

<h3 id="3-add-my-user-to-the-docker-group-to-avoid-needing-to-sudo-every-docker-command">3. Add my user to the Docker group to avoid needing to <code class="language-plaintext highlighter-rouge">sudo</code> every Docker command:</h3>

<div class="language-bash highlighter-rouge"><div class="highlight"><pre class="highlight"><code><span class="o">&gt;&gt;</span> <span class="nb">sudo </span>usermod <span class="nt">-aG</span> docker ytimen
</code></pre></div></div>

<h3 id="4-verify-that-the-docker-engine-and-docker-compose-plugin-installations-are-successful">4. Verify that the Docker Engine and Docker Compose Plugin installations are successful.</h3>

<div class="language-bash highlighter-rouge"><div class="highlight"><pre class="highlight"><code><span class="o">&gt;&gt;</span> docker <span class="nt">--version</span> <span class="o">&amp;&amp;</span> docker compose version
<span class="o">&gt;&gt;</span> docker run hello-world
</code></pre></div></div>

<h2 id="deploying-a-program">Deploying A Program</h2>
<p>Now that I have the server in a relatively secure state, and have installed Docker and Docker Compose, I can run 
programs as containers. Typically, containers are run from images, which are uploaded to a registry and tagged with 
their version or environment name. We can refer to images by their tag or by their digest.</p>

<p>You can think of a digest as being an immutable tag that is based on the image contents. This way, we can distinguish 
between an exact version of an image by its digest, or an aliased image by its tag. Think <code class="language-plaintext highlighter-rouge">&lt;image&gt;:prod</code>, 
<code class="language-plaintext highlighter-rouge">&lt;image&gt;:latest</code>, or <code class="language-plaintext highlighter-rouge">&lt;image&gt;:v1.0</code> for tags that are aliases, whereas a digest might look like 
<code class="language-plaintext highlighter-rouge">&lt;image&gt;:sha256:bf05ebc48776afd98f1748ce1337bca29bdc1f45a6065bc40babbe68aebfc4ac</code>. In fact, all of these tags could even 
refer to this same digest. Anyway, I’m rambling. Let’s get back to deploying a program.</p>

<p>First, I need a Docker image. I wrote some FastAPI endpoints along with a <code class="language-plaintext highlighter-rouge">Dockerfile</code> and <code class="language-plaintext highlighter-rouge">docker-compose.yml</code> file in 
a super secret private GitHub repo. Now using my local machine, I’m going to build it into an image, tag it, and upload 
it to a private artifact registry, where it can then be pulled from other Docker machines, such as my Ubuntu server!</p>

<p>First, let’s make sure I’m logged in to my Docker account from the terminal:</p>

<div class="language-bash highlighter-rouge"><div class="highlight"><pre class="highlight"><code><span class="o">&gt;&gt;</span> docker login 
<span class="c"># Follow the prompts for username and password</span>
<span class="o">&gt;&gt;</span> docker build <span class="nt">--platform</span> linux/amd64 <span class="nt">-t</span> &lt;docker-username&gt;/&lt;registry-name&gt;/&lt;image-name&gt;:&lt;tag&gt; <span class="nb">.</span>
<span class="o">&gt;</span> docker push &lt;docker-username&gt;/&lt;registry-name&gt;/&lt;image-name&gt;:&lt;tag&gt;
</code></pre></div></div>

<p>It’s necessary to include <code class="language-plaintext highlighter-rouge">--platform linux/amd64</code>, because I’m actually running these commands on a Mac, which uses 
linux/arm64. That means that if I build an image regularly on my Mac and push it to the registry, and then tried to pull 
that image from my Ubuntu server, it would download fine… but then it would complain about the architecture when I 
tried to run the image. And since I’m in the business of running software, not just downloading it, I’ll make sure to 
build it with the proper platform flag. Then, I push to the registry with the tag.</p>

<p>Now that the registry holds the tagged image, I can SSH into the Ubuntu server and download the Docker image. I can do 
this implicitly by running:</p>

<div class="language-bash highlighter-rouge"><div class="highlight"><pre class="highlight"><code><span class="o">&gt;&gt;</span> docker run <span class="nt">-d</span> &lt;docker-username&gt;/&lt;registry-name&gt;/&lt;image-name&gt;:&lt;tag&gt;
</code></pre></div></div>

<p>This runs the image as a container, and I’ve specified the <code class="language-plaintext highlighter-rouge">-d</code> flag for detached mode (meaning it’ll run in the 
background). And thar she blows!</p>

<h2 id="conclusion--next-steps">Conclusion &amp; Next Steps</h2>
<p>This guide covered provisioning a server, configuring some basic security measures, installing Docker, and running 
an image pulled from a registry. Next time, we’ll cover 
<a href="/dev-blog/2024/10/01/configuring-https-on-ubuntu.html">how to configure HTTPS</a> to access our program securely.</p>

<h2 id="references">References</h2>
<ul>
  <li>Akamai’s blog posts on <a href="https://techdocs.akamai.com/cloud-computing/docs/set-up-and-secure-a-compute-instance">securing a Linode server</a>, then <a href="https://www.linode.com/docs/guides/remove-unused-network-facing-services/">removing unused services</a>, and finally <a href="https://www.linode.com/docs/guides/configure-firewall-with-ufw/">configuring UFW</a></li>
  <li>Dreams of Code’s <a href="https://www.youtube.com/watch?v=F-9KWQByeU0&amp;t=376s">YouTube video</a> on setting up a production-ready VPS</li>
  <li>Tony Teaches Tech’s <a href="https://tonyteaches.tech/secure-ubuntu-server/">guide</a> on securing an Ubuntu server</li>
  <li>Docker’s <a href="https://docs.docker.com/engine/install/ubuntu/">guide</a> on setting up Docker Engine with Ubuntu</li>
</ul>]]></content><author><name>Yuval Timen</name></author><category term="tech" /><summary type="html"><![CDATA[Let’s be honest. Platform as a Service (PaaS) providers overcharge for a lot of their services. It makes sense - they need to make money somehow. But not on my dime! I’m going to set up my own Virtual Private Server (VPS) for self-hosting, and I’m gonna do it on the cheap.]]></summary></entry><entry><title type="html">In Ancient Times…</title><link href="/dev-blog/2024/08/12/tattoo-story.html" rel="alternate" type="text/html" title="In Ancient Times…" /><published>2024-08-12T20:50:01+00:00</published><updated>2024-08-12T20:50:01+00:00</updated><id>/dev-blog/2024/08/12/tattoo-story</id><content type="html" xml:base="/dev-blog/2024/08/12/tattoo-story.html"><![CDATA[<p><em>Based on a dream I had in 2022.</em></p>

<p><img src="/dev-blog/assets/images/tattoo_story_cover.png" style="display:block; margin-left:auto; margin-right:auto" /></p>

<p>In ancient times there lived an ancient civilization that worshipped humanity. These people were very industrious and built cities unrivaled in their era. These cities grew monstrously large and efficiently housed, fed, and accommodated upwards of a million individuals, which was a great feat in the pre-Industrial times.</p>

<!-- excerpt-start -->
<p>Their cities were wonders of the ancient world - great feats of science, engineering, art, and philosophy lined their streets. 
<!-- excerpt-end -->
They showcased their triumphs in all aspects of their society.</p>

<p>Their kingdom was ruled not by a monarch, but by a council of philosophers. Each law that passed was done so with meticulous attention to detail; their debates would rage on for hours. But contrary to today’s debates, these would remain dispassionate and logical, and hatred was not even in their vocabulary. They would consider the pros and cons of something and would argue using philosophical principles rather than emotions. You’d think that they would never have gotten anything done, since they spent so long arguing, but that’s the opposite of the case. They operated under a shared set of values and would not allow emotions and impulses to impede on their values. This allowed them to focus on the real issues. Slander, racial bias, and intolerance were inconceivable to them - it was the inner expanse of the mind that captivated these people.</p>

<p>If one of us could take a stroll down their streets, we would find ourselves in an entirely new world and the people would appear almost alien. Each individual carried themselves in the highest regard, with a straight back and an inflated chest. They walked majestically and talked slowly and soothingly.</p>

<p>But the most stark difference between us and them was their skin! For these people worshipped humanity and valued the inner complexity and contradictory nature of the human mind. They realized that each individual was a complicated mass of thoughts and feelings, of experiences and aspirations. And they recognized the fact that these inner complexities scarcely revealed themselves in an individual’s outer appearance. And so it became a custom in this once-great city to heavily tattoo oneself in symbols and images, as a reminder to oneself and to the individuals surrounding oneself that they, too, were a complex individual. The tattoos were a way to externalize their inner complexities.</p>

<p>It became such that, in the social hierarchy of this civilization, the more numerous and complex an individual’s tattoos appeared, the more human, and thus the more divine, that individual was regarded. And thus it was that the wealthier of the bunch invested immense resources in painting themselves in more and more intricate ink.
There were a number of developments in this regard - first, the introduction of multiple colors of ink to symbolize the multifaceted nature of human emotions, and the “colors” of anger and happiness and all other emotions that lie in between. 
Next, the use of optical illusions was used to signify that what appears at first may not be what truly lies beneath. The people really loved this one. 
Next, the development of mosaic-style tattoos, where many small images combined to form an overarching image of some entity such as a lion or a throne, was used to portray the constituent parts of their being forming a single, complex and contradiction-riddled individual. Eventually, they took this one step further by creating mosaics made of mosaics. They were truly a creative bunch.
At some point, groups of these people banded together to form inter-individual images; each individual would have part of an image and, when they stood in a particular arrangement, often hugging or standing side-by-side, the full image emerged. This was to signify that, although individuals were complex and interesting in themselves, they live in a society and are thus incomplete without their fellow persons. I’m sure you could imagine that group tattoos were all the rage back then.</p>

<p>But what was the effect of all this craze? These tattoos were the physical manifestation of the inner struggles and the inner complexity that each person experienced. And the outer manifestation, that emerged in order to serve as a reminder of this inner wealth, eventually came to replace it, in much the same way that, today, people mistake the paper money they hold to be of more importance than the resources it affords for them.</p>

<p>We can see this shift of priority in these people’s pastimes. They would begin to hold competitions where individuals or groups would compete to show off their luxurious and complicated tattoos. These shows, similar to the Roman gladiator games, would attract massive crowds that would participate in every wretched and vile form of hedonism one could imagine during the intermittent periods between performances. And once all the performers had shown off their physical humanity onstage, the audience would vote on who is the “most human” of the humans. I’m sure you can easily see the irony here. They did as well, but rather than recognize it’s absurdity, they allowed themselves to believe it was just another beautiful contradiction of the human condition.</p>

<p>Over time, these competitions became more lavish and more decadent. Along the way, they lost the love of the humanity they once had and shifted toward the love of the superficial, the love of the images on their skins. What was once a civilization obsessed with humans eventually became a society obsessed with façades.</p>

<p>This was all good and well, until one day, a very wise individual was born and grew up in this society. Her parents taught her the values that the society supposedly worshipped, but she immediately saw the contractions. When she became of age and her parents and friends urged her to get her first tattoo, she declined. “I know my own inner wealth. I do not need pictures on my skin to remind me or anyone else that they exist” she argued.</p>

<p>And so she went her adult life having never gotten a single dot or line of ink. This, you must understand, was highly unusual. People stared at her wherever she went. And people began to think about this - in the sea of ink and images, here was one person who was different. <em>Why did she refuse to conform?</em> they thought. But then, upon having this thought, they realized that she embodied their values more strongly than anyone else. She refused to give into the society’s expectations, and recognized her own inner wealth as being sufficient for her. This was a radical idea at the time, although I’m sure you agree that it is actually anything but. It was the fundamental idea that their civilization was built upon, but the people had become so preoccupied with their obsession that they had gone astray somewhere along the way. And this individual, with her will of steel, embodied the fundamental ideal in its entirety.</p>

<p>She soon rose to fame among these people - the girl who did NOT have a tattoo. It was the ultimate form of expressing one’s inner complexity - by allowing it to remain implicit. This was considered an invention in itself, and caused an enormous social ripple.</p>

<p>And so it went that these people had undergone a full circle. And it became enshrined in the mythology and lore of the civilization that this one person and her realization of the absurdity of their society, was one of the most important historical and philosophical events of these peoples’ history.</p>

<p>Now today, many millennia later, we come to appreciate their transformation. We read their stories and study their ideas, and find their spirits within us. And although their society has since disappeared, we find that they are still very much here.</p>]]></content><author><name>Yuval Timen</name></author><category term="short story" /><summary type="html"><![CDATA[Based on a dream I had in 2022. In ancient times there lived an ancient civilization that worshipped humanity. These people were very industrious and built cities unrivaled in their era. These cities grew monstrously large and efficiently housed, fed, and accommodated upwards of a million individuals, which was a great feat in the pre-Industrial times. Their cities were wonders of the ancient world - great feats of science, engineering, art, and philosophy lined their streets.]]></summary></entry><entry><title type="html">What is this place…?</title><link href="/dev-blog/2024/08/11/welcome-to-my-blog.html" rel="alternate" type="text/html" title="What is this place…?" /><published>2024-08-11T20:50:01+00:00</published><updated>2024-08-11T20:50:01+00:00</updated><id>/dev-blog/2024/08/11/welcome-to-my-blog</id><content type="html" xml:base="/dev-blog/2024/08/11/welcome-to-my-blog.html"><![CDATA[<p>I’m someone who gets obsessed with things. What things? Well, to name a few…</p>

<ul>
  <li>Math.</li>
  <li>History.</li>
  <li>Software.</li>
  <li>Data.</li>
  <li>Maps.</li>
</ul>

<p>You name it.</p>

<p>And when I do sink my teeth into my next victim, I often find 
that I need an outlet in order to synthesize my thoughts about what I’m reading or doing.</p>

<!-- excerpt-start -->
<p>I’ve often found a lot of pleasure in just spending a day hacking away on a Markdown 
document to fully flesh out my ideas, to nail down my understanding about a topic, or just 
to see the swirling mass of figures and pictures in my head materialize in front of me.
<!-- excerpt-end --></p>

<p>This is why I created this blog. The purpose of it is to serve my purposes of organizing my 
brain in a way that is presentable to me and to anyone else who may stumble upon it.</p>

<p>So to my readers, I bid thee fair winds in thy sails! Feel free to reach out if you wanna talk.</p>

<p>‘Til next time!</p>]]></content><author><name>Yuval Timen</name></author><summary type="html"><![CDATA[I’m someone who gets obsessed with things. What things? Well, to name a few… Math. History. Software. Data. Maps. You name it. And when I do sink my teeth into my next victim, I often find that I need an outlet in order to synthesize my thoughts about what I’m reading or doing. I’ve often found a lot of pleasure in just spending a day hacking away on a Markdown document to fully flesh out my ideas, to nail down my understanding about a topic, or just to see the swirling mass of figures and pictures in my head materialize in front of me.]]></summary></entry></feed>